Upgrading to a 3G Alternator in a Bullnose Ford Truck (1980-1986)
Upgrading the alternator in your 1980-1986 Bullnose Ford truck to a more powerful and efficient 3G alternator is a popular and highly beneficial mod. The stock 1G alternators found in these trucks are often underpowered for modern electrical demands and are notorious for reliability issues, particularly as they age. This article covers why doing the 1G to 3G alternator swap is worthwhile, how to source parts, potential aftermarket options, and key considerations, including insights from MotorTrend’s detailed guide on installing a high-output 3G alternator in older Ford vehicles.
Why Upgrade to a 3G Alternator?
Increased Electrical Capacity: The 3G alternator offers significantly more power than the stock 1G alternator, delivering up to 130 amps or more compared to the 60-70 amps typical of the 1G units. This increased capacity is crucial for supporting modern electrical accessories such as high-output headlights, electric fans, powerful stereos, and other aftermarket electronics.
Improved Reliability: The 1G alternators are prone to issues, including wiring fires due to weak connections and undersized wiring. By contrast, the 3G alternator is known for its robust design and reliable performance, making it a dependable choice for daily driving or long trips.
Elimination of External Regulator: The 3G alternator features an internal voltage regulator, which simplifies the wiring setup and reduces potential points of failure compared to the externally regulated 1G system.
Better Performance at Idle: Unlike the 1G alternator, which struggles to provide adequate power at idle, the 3G alternator delivers higher output even at low engine speeds. This is especially beneficial in traffic or during off-road conditions where you may be idling frequently.
Sourcing Parts for the 3G Alternator Swap
When performing a 1G to 3G alternator swap, you can source the necessary parts from several vehicles or opt for aftermarket solutions designed specifically for this upgrade. Ensure the alternator you get has the mounting ears at 6 o’clock and 12 o’clock for swapping directly into a bullnose Ford. That is unless you like custom modification or have an aftermarket mounting bracket.
The following vehicles commonly come with the 3G alternator that can be adapted for your Bullnose Ford truck:
- 1990-1994 Ford Taurus (3.8L V6): Common donor for the 3G alternator.
- 1991-1992 Ford Taurus (3.0L V6): Another potential source for the 3G alternator.
- 1993-1994 Ford Bronco (8-cylinder): Offers the larger 130A alternator.
- 1994-1996 Ford F-Series (4.9L I6): Ideal for truck swaps, with a direct-fit 3G alternator.
- 1992 Ford E-Series (all engines): These vans come with 3G alternators.
- 1993 Ford E-Series (8-cylinder): Equipped with a dual-mounting 3G alternator.
- 1994-1996 Ford E-Series (4.9L & 7.5L engines): A good source for the higher output 130A alternator.
- 1991-1994 Lincoln Continental (3.8L V6): Features a 3G alternator that can be used in swaps.
- 1994-1995 Mercury Sable (3.8L V6): Similar to the Taurus, also equipped with a 3G alternator.
- 1991-1992 Mercury Sable (3.0L V6): Can be adapted for use in your Bullnose.
- 1995 Ford Windstar (3.8L V6): Early models (built before 3/1/94) are equipped with 3G alternators.
- 1994-1997 Ford Thunderbird (3.8L V6): Excluding the Super Coupe, these models often have 130A alternators.
- 1994-1997 Mercury Cougar (3.8L V6): Another potential source for the 130A 3G alternator.
- 1994-2000 Ford Mustang (3.8L V6): A reliable donor for the 3G alternator.
2. Aftermarket Options: If you prefer new parts or want to ensure maximum performance, aftermarket 3G alternators are available that are designed to bolt directly into your truck. These typically come in various output ratings, ranging from 130 amps to over 200 amps, depending on your electrical needs. Aftermarket kits often include the necessary wiring upgrades and hardware to simplify the installation process.
3G Alternator Case Sizes: 90A vs 130A Models and Identification
The 3G alternator comes in two case sizes, which correlate to their amperage output:
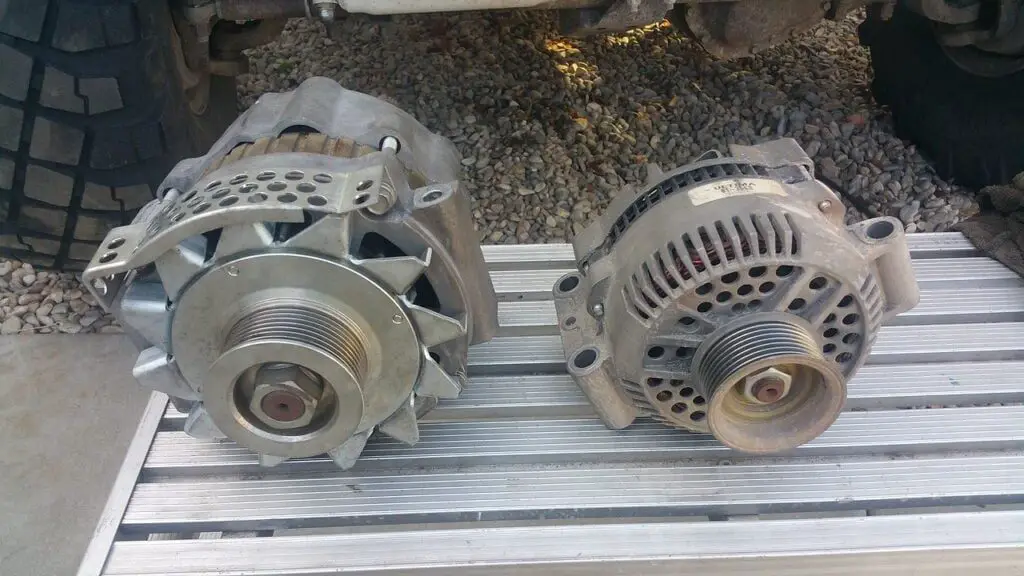
- 90A Model (Small Case): Compact and easier to fit into tighter engine bays, this version is ideal if you don’t run many electrical accessories. It typically features four cooling holes in the three “ribbed” sections on the front casing, making it easy to identify.
- 130A Model (Large Case): This larger alternator is designed for trucks with higher electrical demands, such as those with electric fans, aftermarket lighting, or high-powered sound systems. It has two cooling holes in the three “ribbed” sections, which can help identify it as the larger frame.
Both versions are reliable, but if you’re upgrading to the 130A model, ensure your truck’s wiring is up to the task by installing 4-gauge wires and a 150-200A mega fuse.
Steps for the 3G Alternator Swap
1. Preparation and Tools Needed:
- Socket and wrench set
- Wire cutters and strippers
- Electrical tape or heat shrink tubing
- New wiring harness or 4-gauge wire for upgraded connections
- Mega fuse (150-200 amps)
- Pulley remover (if swapping pulleys)
2. Removing the Old Alternator:
- Disconnect the negative battery terminal to prevent any electrical shorts.
- Remove the drive belt by loosening the tensioner and slipping the belt off the alternator pulley.
- Disconnect the electrical connections from the 2G alternator, noting the wiring configuration for reference.
- Unbolt the 2G alternator from its mounting brackets and remove it from the engine bay.
3. Preparing the 3G Alternator:
- If necessary, swap the pulley from the old alternator onto the 3G unit, ensuring it matches the belt configuration of your truck.
- Install the new 3G alternator onto the engine using the original mounting brackets. Some minor adjustments may be needed depending on the specific alternator model.
4. Wiring the 3G Alternator:
- Main Power Wire: Use a 4-gauge wire to connect the 3G alternator’s output post directly to the battery, passing through a 150-200 amp mega fuse. This wire replaces the undersized factory wiring.
- Exciter Wire: Connect the exciter wire from the 3G alternator to the original ignition switch wiring. This wire signals the alternator to begin charging.
- Sense Wire: This wire typically connects to a constant 12V source, which allows the internal regulator to monitor the battery’s voltage.
5. Final Steps:
- Reinstall the drive belt, ensuring proper tension.
- Double-check all connections for security and correctness.
- Reconnect the battery and start the engine to test the new alternator. Check for proper charging voltage (13.5-14.5 volts) at the battery with the engine running.
Cost and Difficulty of the 2G to 3G Alternator Swap
Cost:
Swapping the stock 1G alternator for a more powerful and reliable 3G alternator in a bullnose Ford truck can vary in cost depending on whether you source parts from a donor vehicle, purchase new components, or opt for aftermarket upgrades. Here’s a general cost breakdown:
- 3G Alternator: $100 to $300, depending on whether it is sourced from a junkyard, purchased as a rebuilt unit, or bought new. Donor vehicles like the 1993-1996 Ford F-Series or E-Series vans are common sources.
- Wiring Harness or Upgrade Kit: $20 to $100, for an upgraded wiring harness that can handle the higher output of the 3G alternator. Some kits also include relays and fuses.
- Mega Fuse (150-200 amps): $10 to $30, essential for protecting the electrical system with the higher output alternator.
- Pulley (if needed): $10 to $30, in case you need to swap or replace the pulley to ensure proper belt alignment.
- Battery Cables (if upgrading): $20 to $50, for heavy-duty cables if your existing cables are not rated for the higher output.
- Professional Installation (if not DIY): $100 to $300, depending on labor rates and the complexity of the installation.
- Miscellaneous Hardware (bolts, spacers, connectors): $10 to $50, for any additional parts needed to complete the swap.
Overall, the total cost of the 2G to 3G alternator swap can range from $170 to $860 or more, depending on the parts used and whether you choose to install it yourself or have it done professionally.
Difficulty:
The difficulty of swapping the 2G alternator for a 3G alternator is moderate, requiring some mechanical and electrical knowledge. Key factors affecting the difficulty include:
- Mechanical Skills: Moderate mechanical skills are required to remove the old alternator, install the new one, and ensure proper belt alignment. Electrical skills are also needed to upgrade the wiring and install the necessary fuses and relays.
- Tools and Equipment: You’ll need basic hand tools such as wrenches, sockets, and screwdrivers. An electrical multimeter may be helpful for testing connections and verifying proper installation.
- Time Commitment: The swap can take several hours to a full day, depending on your experience level and whether any unforeseen issues arise during the installation.
- Potential Challenges: Challenges may include ensuring the correct alignment of the alternator pulley, upgrading or adapting the wiring harness, and installing a mega fuse to protect the electrical system. Proper grounding is also critical to avoid charging issues.
Given the moderate complexity, this upgrade is well within the capabilities of most DIY enthusiasts who have some experience working on their vehicles. However, if you are unfamiliar with automotive electrical systems or encounter difficulties, it may be wise to seek professional assistance to ensure the swap is done safely and correctly.
Potential Difficulties and Considerations
Pulley Alignment: Mismatched pulleys can cause belt noise or premature wear. If the pulley from your 1G alternator doesn’t fit the 3G unit properly, consider sourcing a compatible pulley or using a spacer.
Wiring Upgrades: Upgrading the wiring is essential to handle the increased amperage of the 3G alternator. Skipping these upgrades can lead to overheating or even fires.
Clearance Issues: The larger 3G alternator may create clearance issues with nearby engine bay components, like the radiator hose or air intake.
Voltage Regulator Compatibility: The 3G alternator uses an internal voltage regulator, so the external regulator from the original 1G setup should be bypassed.
Aftermarket Options and Enhancements
For those looking to maximize the benefits of the 3G swap, consider the following aftermarket enhancements:
1. High-Output Alternators: For trucks with high electrical demands, such as those equipped with winches, high-powered lighting, or aftermarket sound systems, high-output versions of the 3G alternator are available. These units can produce 200 amps or more, ensuring ample power for all your accessories.
2. Heavy-Duty Wiring Kits: Several manufacturers offer pre-assembled heavy-duty wiring kits specifically designed for 3G alternator swaps. These kits include correctly sized wires, fuses, and connectors, simplifying the upgrade process and ensuring safe operation.
3. Voltage Stabilizers: To further protect sensitive electronics, consider installing a voltage stabilizer, which smooths out voltage spikes and provides consistent power to your truck’s electrical components.
Conclusion
Upgrading your bullnose Ford truck’s 1G alternator to a 3G alternator is one of the most impactful electrical upgrades you can make. The 3G alternator provides superior performance, reliability, and capacity, ensuring that your truck’s electrical system can handle modern demands with ease. Whether you source your parts from a junkyard or opt for high-performance aftermarket components, the 3G alternator swap is a smart investment in your truck’s future.
By following the steps outlined above and addressing potential challenges, you can successfully complete this upgrade and enjoy the benefits of a more robust and reliable charging system. Whether you’re restoring a classic or building a custom rig, the 3G alternator swap is a modification that will serve you well for years to come.
Insights from MotorTrend’s Guide
MotorTrend’s article on installing a high-output 3G alternator provides additional tips and considerations for those performing this upgrade:
1. Belt Alignment and Tension: MotorTrend emphasizes the importance of ensuring the drive belt is correctly aligned and properly tensioned. Misalignment can cause premature wear on the belt and pulleys, leading to belt slippage or failure. If the 3G alternator’s pulley doesn’t match the existing belt system, you may need to swap the pulley or use a spacer.
2. Grounding: MotorTrend highlights the importance of proper grounding when installing a 3G alternator. The alternator case must be securely grounded to the engine block. Inadequate grounding can lead to charging issues and potential electrical noise in your truck’s audio system.
3. Wiring Considerations: MotorTrend’s guide also discusses the importance of upgrading the factory wiring to accommodate the higher output of the 3G alternator. Using a heavy-duty wiring kit or custom-made cables is recommended to handle the increased current, and installing a mega fuse is crucial for protecting the electrical system.
For more detailed installation tips and additional information, you can check out the MotorTrend guide on installing a high-output 3G alternator.
If you want more specific information on Bullnose Ford Trucks, check out my YouTube Channel!
For more information on Bullnose Trucks and Broncos, you can also check out the BullnoseFord SubReddit or Gary’s Garagemahal, both are excellent resources.