Archives October 2020

Published on October 31, 2020

Click to play the video inline  or  see it on YouTube

Part of the The Bullnose F-150 series.
Part of the Ford Truck Systems and Parts series.

Want to see more like this? Subscribe to Bullnose Garage!

Show Transcript

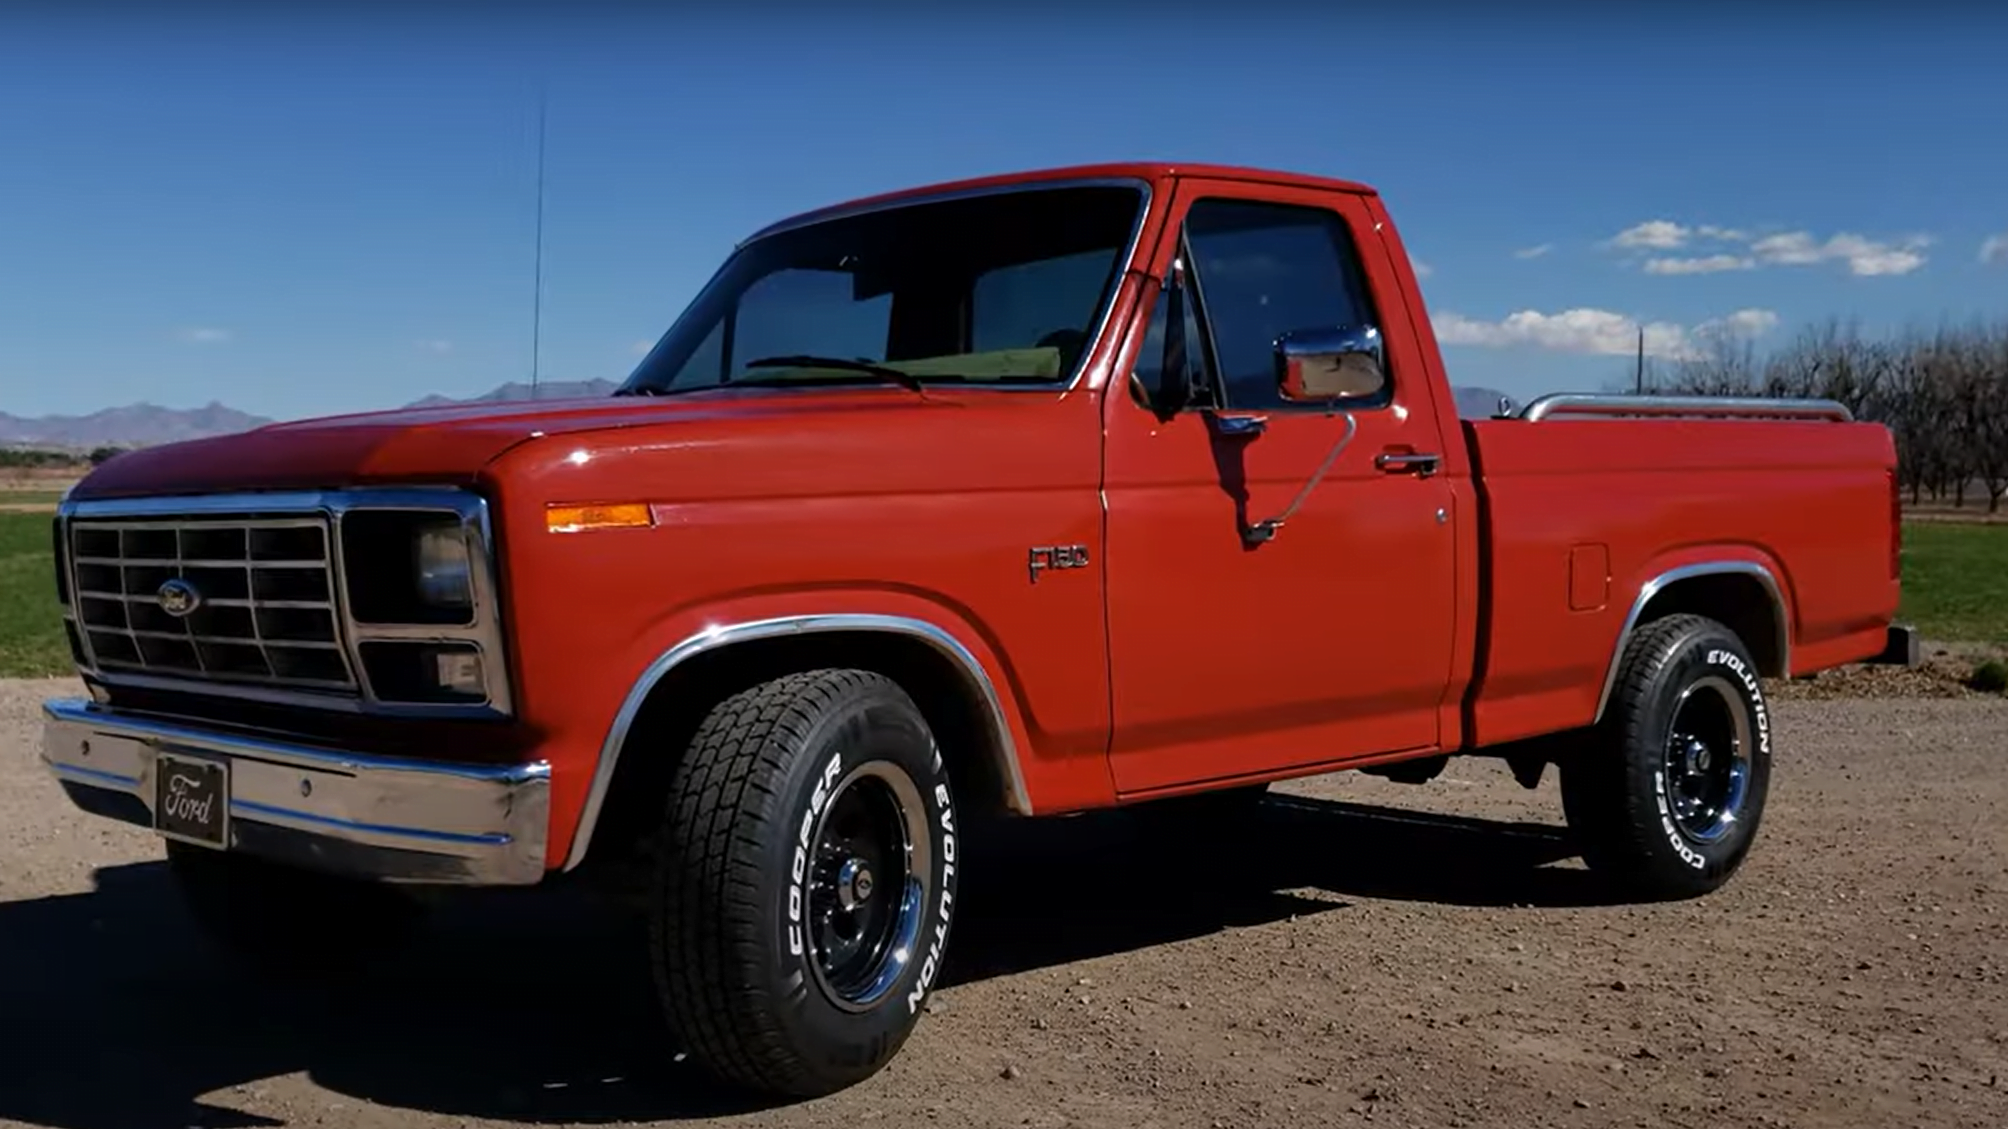
Howdy folks, Ed here from Bullnose Garage. I’m getting new wheels and tires, and that makes me pretty happy. Um, here we are. As you can see, I’m back from the wheel and tire store. Got my brand new wheels and tires. These wheels are Vision Soft Eight wheels. I presume they’re called Soft Eight because they got eight holes around the center. They’re made by Vision, but actually, these particular wheels are branded by a whole bunch of different places. You can get them from, uh, Krager, Vision, Blackrock, Pacer, even Jegs has a version of these that’s under the Jegs brand. My guess is that some place manufactures them, and then other places rebrand them and sell them as their own. Whatever the case, Vision was the cheapest for me, so Vision is the brand that I got. I just love the look of these old-school black rims with the chrome center caps. These are actually trailer center caps, but they work pretty nice. And then, of course, I got my bullet lug nuts on there. The tires are Cooper Evolution HT tires, so those are highway tires. And I got highway tires because this truck is never going to see any kind of off-road work other than my driveway, and I want it to be a little bit more sporty than off-road looking. It’s a two-wheel drive, so it doesn’t need to have big knobby crazy tires on it, but I didn’t want something so sporty that it didn’t look like a truck anymore. So that’s why I chose a highway truck tire. The Coopers just happen to have fantastic reviews and were the right price. And another big thing about them that I like is that the, uh, Cooper Evolution lettering is white outlined when you have it facing out. And I’m actually going to take a white Sharpie oil-based pen, paint pen, and color that in so it pops a little bit more. I’m going to have a separate video on how I’m going to do that. Should be really interesting. I’m looking forward to seeing how that turns out. So, God, it’s a lot. Just love that old school look with the white wall or the white letter tires and the black rims and the beauty rings. I can’t wait to get my beauty rings on. So, uh, let’s go ahead and do that now.

I said before that I really like the look of a classic black steel wheel, especially on an old school project. So I got the Soft Eight because that’s exactly what it is, and it allows me to sort of customize the way that it looks. What I’ve got here is some of the stuff that I’m using to do that customization. We’ll start with the center cap. This is just a four and a quarter inch push-through center cap. It’s like five bucks from Amazon. There’s not much to it. Generally, these are actually used for trailer wheels, but they’ll work perfectly for what I’m trying to do here. And they have a removable center so that you can grease your hubs. And what I’m going to use this for is I’m going to go find a 50 millimeter Ford sticker that I can put right there to make it look a little bit nicer. You got several center cap options. You can do something, a push-through cap like one of these. You can get a branded push-through cap for different wheel manufacturers. You could also get the sort of OEM look, uh, Ford center caps, or you can go out and get a real fancy sort of old school spider center cap that has the lug nuts kind of coming off from the bullet center. All of those are expensive. These are like five dollars a piece, and they look really nice. But the nice thing is that if I decide later on that I don’t want these or I want to do something different, I can just take them off and put something else on. I chose these bullet lug nuts because I thought they’d look neat, and it’s actually cheaper to go online to get these from Amazon than it would be to have, say, Discount Tire, who is who I’m having put the tires and wheels on, uh, to buy their lug nut kit. It’s like 45 bucks. These on Amazon were like 25 bucks. So, and they’re kind of neat. Uh, for my particular truck, these are one half by 20. So always make sure you get the right size.

And finally, I am a sucker for chrome beauty rings. So that’s what I have here is a, actually, it’s a metal 16 inch chrome beauty ring. And because the Soft Eight is your basic steel wheel, this should just pop right on. Just, uh, blings things up a little bit for me. If I’ve got a black tire on a black rim, they kind of blend into each other. I like having that nice separation there that makes it very clear where the rim ends and the tire begins. Personal preference. I got these beauty rings or trim rings from Amazon, and they’re kind of generic. I’m not entirely sure they’re going to fit on this rim. Everything that I’ve read in the research that I’ve done says that beauty trim rings should fit right onto these old school steel wheels, even if they’re aftermarket. But I’ve never done it before, so it’s moment of truth. Wish me luck. It’s pretty tight, but… and there we go, trim ring installed. Now, like I just said, it’s pretty tight, but it does go on there, and I guess that’s good. It means it’s not going to come off while I’m driving down the road. Keep in mind that if you do this, you’re really going to scratch up this black paint because that’s all it is. It’s just black paint on these rims, and I’m not too worried about that because these beauty rings are going to cover that up, and I’m planning on always having beauty rings on here. And worst case, you can always repaint them if you have to.

Here’s the back rim. I thought I’d give you a little bit more close-up view of what I’m doing. These trim rings are just real simple. All there are some clips. Make sure you get your valve stem through the right spot right here, and just bang them on. Like I said, they’re tight. And there we go. So, of course, you can’t put on new wheels and tires without adding custom valve stem caps, which is what I have here. Let me see if you can see that or not. There we go. Yep. So probably nobody’s ever gonna see it, but they’re neat, and they were a gift, so I’m gonna put them on right now. Here we go. Nice. These tires are 245/75/16. Now, the stock tires that came on this truck were 15 inch tires, and these are, of course, 16 inch rims with 16 inch tires. I went with 16s because, of course, bigger rims are a little bit sportier, and I also knew that I was going to be having this big trim ring around the outside, which is going to sort of enhance the apparent size of the rim. So I went with 16s. I could have went with something a little bit wider or even a little bit taller to fill out the wheel well more, but again, it’s supposed to be more of a sporty truck. I don’t want to lift it. I don’t want to make it, you know, a big monster or anything. At some point, I may lower it a little bit, but probably not. I think I’m just going to keep it stock height. And so these tires, I think, fill these wheel wells appropriately. I think they’re the right size. They’re a little thinner than I could have gone, but again, that’s more for the sportier nature of the truck, and they’re a highway tire, so they don’t really need to be really wide or weird looking. Down here in the Southwest, you get a lot of vehicles that have really, really wide tires or tires that stick out really far from the wheel fenders, and I just like that look. So I wanted something more or less stock that was just a little bit sportier. That’s why I went with that size.

While I was going around changing all my wheels and tires, I figured I probably ought to do the spare too, so I went ahead and got a 15 inch spare tire. It’s about as cheap of a tire as I could find, but it’s still a full-size tire. So if something ever happens, I should just be able to pop that rim and tire wherever I need to pop it on and drive it for pretty much as long as I need to. So that was important because all of the tires on this truck, especially the spare, were very old. Now, the tires that were on the truck were at least 10 years old. I have no idea how old the spare was, but it’s probably a good time to talk about that fact that those tires were 10 years old, and I drove this truck for a couple of years with tires that old. And just recently found out that tires older than 10 years are really pretty dangerous. As a matter of fact, I went to the same place I got these wheels and tires and tried to have them patch one of my old tires, and they refused and said, ‘No, that’s too old. Company policy says we can’t patch a tire that old.’ And after giving them a little bit of a sob story, they went ahead and patched it for me just so I can get back on the road again. But that really sort of tripped me into getting these new wheels and tires because I think it was time. And, uh, of course, being a father of two now, I need to be responsible for my own health. So blowing out on the highway probably wasn’t a good idea. So if your tires are over 10 years old, change your tires because even if the tread is good, I learned this, even if the tread is good, the tire rubber itself starts to go bad, and it’ll dry out, it’ll crack, it won’t be as, uh, elastic anymore. You won’t be able to take those bumps, and, um, it won’t be as able to absorb things on the road. They’re easier to blow. Um, yeah, it’s just bad news all around. So make sure if your tires are older than 10 years that you take care of that.

One thing you want to make sure of when you’re buying an aftermarket rim is that you get the correct width and the correct offset and backspacing. Offset and backspacing are kind of the same thing. They’re different numbers, but they relate to each other, and that’s how far the rim sticks out side to side. And that’s going to affect you, especially in the front where you’re turning the tire, turning the rim, whether or not that’s going to impact inside your fender well, if it’s going to rub or bump anything up in here. As a matter of fact, if you get it too shallow, it could even interact with some of the steering components, uh, brake components up in the front of your vehicle. So you want to make sure that you get that not too shallow and not sticking too far out because you get it sticking too far to look funny. Another thing that you want to do is make sure that you get the correct width rim for the tire that you’re going to fit. So tire sizes like this one is 245/75/16. The 245/75 is a ratio of width to height, and the 16, of course, is the rim size. So the wider the tire, the bigger that first number is going to be. So 245 for a truck is not that wide. If I got something like 275, 285, 305, then I might actually start running into problems with this rubbing the fender wells, or especially in the front where you’re steering, it could, you know, hit the fenders or some of the, uh, this, the plastic stuff up in here. Actually, it’s metal back here. Well, who knew? So anyway, yeah, that’s something you want to, uh, definitely pay attention to. And if you’re getting extra wide tires, you want to make sure that you get a rim that has the correct width because if you don’t, then the tire, if it’s just too thin of a rim, the tire could actually bulge out, and then you’ve got uneven wear. And if it’s too thick of a rim, then the tire will actually come out and create like a little V-shape, uh, which is not good for the tread and tire wear and safety either. So for 245, this is an eight inch wide rim. It’s perfect. And just make sure when you’re getting your tires and wheels together that if you’re doing it on your own and you’re doing your own research and you’re finding your own stuff that you appropriately match the tire width to the rim width.

When I went looking online for how wheels and tires like this set here would look on my older truck, I found it really hard to find examples of how these particular wheels would look. All these wheel and tire stores online have these visualizers, you know, these fancy web programs that let you see what the wheels look like on your vehicle, but none of them go back to ’85. So the only option that I had was to go online and try to find someone who had not only put wheels and tires like this on their truck, but also had taken pictures of it and posted those pictures online for everyone to see in a way where I could search for it and find it and take a look. I just didn’t see much, so these wheels and tires were kind of a shot in the dark, and I’m really happy with how they turned out. And that’s one of the reasons that I made this video was so that anybody else who’s got an older truck like this ’85 F-150 could see what wheels and tires with this kind of a look would look like on that truck or a truck about that same year, and then also what kind of options you had in terms of your, uh, push-through center caps, lug nuts, beauty rings, that kind of stuff.

Now, I know a lot of guys would tell me that I shouldn’t have strayed away from the OEM look, that these old Ford hubcaps are classic and, uh, that they really just make the truck look nice, and that if you’re going to do a truck restoration or a registration of any kind, that you really should just stay with OE stuff and not add all this fancy bling-bling stuff. And to those guys, I say, well, you’re entitled to your opinion, but it’s my truck, and I’m going to do things the way that I want to do them. And I really, really like the way that these turned out. By the way, you may notice that these tires look a little bit different than they did earlier in the video, and that’s because I’ve gone ahead and colored in the letters to make them pop more, make it even more of a kind of white wall old school look that you just can’t get from tire stores anymore. So you have to paint that, and I’ve got a video coming up that’s going to show you exactly how I did this and, you know, talk about what materials I used and how long it took because it took forever. But I do like the way that it turned out. I think it looks really cool. I look super cool on the truck, but you’re gonna have to wait for that video to come out to see just how all four tires with the new white lettering looks on the truck going down the road. I’m super excited to shoot that and get that out.

Guys, if you found this video helpful to see what wheels and tires like this might look like on a truck like that, or if I entertained you in any way, shape, or form, go ahead and give me a thumbs up for the video. That really helps me out. And hey, you know, if you, uh, if you’re interested in seeing where I go with this truck, what kind of stuff I do to it in the future, all the big plans that I’ve got for it. I know I’ve got a brake overhaul coming up. I’m doing front and rear brakes completely overhauled. Um, I’m probably going to end up redoing the suspension, and obviously I’ll be doing the engine and all kinds of interior updates, maybe stereo, all kinds of stuff. If you’re interested in seeing any of that, keeping up with what I do, make sure you subscribe to the channel. I’ll be posting videos, uh, as much as I can to get this information out there. I really enjoy doing it, and I hope you guys enjoy watching it. So, as always, if you have any questions, comments, concerns, gripes, internet ramblings, stick them below. Thanks again for watching, guys. We’ll see you next time.

Hey folks, Ed here from Bullnose Garage. Today we’re diving into something that makes my gearhead heart sing—new wheels and tires for the Bullnose. Yep, we’re swapping out those old shoes for some classic black steel Vision Soft 8 wheels paired with Cooper Evolution HT tires. If you think that sounds like a match made in automotive heaven, you’re absolutely right.

Why Vision Soft 8?

You might be wondering why I went with the Vision Soft 8 wheels. Well, aside from the fact that they’re budget-friendly, these wheels offer a blank canvas to customize the look of my truck. With a simple black finish and eight holes around the center, they’re marketed under various brands like Krager, Blackrock, and even Jegs. But I got mine from Vision because they were the cheapest option. These wheels are a nod to old-school style with chrome center caps that are actually trailer caps repurposed for a little flair.

Customization Options Galore

The beauty of the Soft 8 wheels lies in their flexibility. You can slap on any center caps, lug nuts, trim rings, or valve stem caps you want. I went with bullet lug nuts because they look neat and are cheaper online than from local stores. For the center caps, I used 4 and a quarter inch push-through caps with a removable center, which is handy for greasing the hubs.

The Tires: Cooper Evolution HT

Now, let’s talk tires. I chose the Cooper Evolution HT, a highway tire that suits my two-wheel-drive truck perfectly. No off-roading for this beast—just smooth, sporty rides. These tires have fantastic reviews and were priced right. Plus, they come with white outlined lettering that I’m planning to highlight with a white Sharpie oil-based pen. Yes, I’m giving it that classic white wall look, and yes, there will be a video on that.

Size Matters

I opted for 245/75/16 tires. The original tires were 15 inches, but I wanted something sportier without going full monster truck. The 16-inch rims fill the wheel wells just right. I could’ve gone with wider tires, but I prefer the sporty, stock-ish look. And let’s face it, I’m not planning on lifting the truck anytime soon.

Beauty Rings and Valve Stem Caps

Ah, the chrome beauty rings. These metal 16-inch rings pop right onto the Soft 8 wheels, adding a nice separation between the black rims and tires. Sure, they might scratch up the paint a little, but who cares? They look fantastic. As for valve stem caps, I have some custom ones that were a gift. They’re a small detail, but hey, it’s the little things that count.

The Spare and the Importance of Tire Age

While I was at it, I replaced the ancient spare tire with a cheap 15-inch full-size tire. It’s a relief knowing I have a reliable spare in case of emergencies. Speaking of emergencies, if your tires are over 10 years old, replace them. Trust me, old tires are a blowout waiting to happen.

Technical Tidbits: Offset, Backspacing, and Width

When picking aftermarket rims, you need to get the right width, offset, and backspacing. These factors determine how the rim sits on your truck and whether it will rub against your fender or steering components. For the 245/75/16 tires, an 8-inch wide rim is just right. Make sure your tire and rim widths match to avoid uneven wear and safety issues.

The Hunt for the Perfect Look

Finding examples of wheels like these on an ’85 F-150 was tough. Online visualizers don’t go back that far, so I took a gamble with these wheels and tires. I’m thrilled with the outcome, and I hope this post helps anyone else in the same boat.

Conclusion

There you have it, folks—the Vision Soft 8 wheels paired with Cooper Evolution HT tires are my latest upgrade to the Bullnose. If you found this entertaining or useful, give me a thumbs up on the video and consider subscribing to the channel. I’ve got more projects in the pipeline, from brake overhauls to interior updates. As always, drop your comments, questions, or internet ramblings below. Thanks for stopping by, and see you next time!


Bullnose Garage at YouTube

If you want more specific information on Bullnose Ford Trucks, check out my YouTube Channel!

For more information on Bullnose Fords, you can check out the BullnoseFord SubReddit or Gary’s Garagemahal. Both are excellent resources.

As an Amazon Associate, I earn from qualifying purchases. If you see an Amazon link on my site, purchasing the item from Amazon using that link helps out the Channel.

Published on October 26, 2020

Click to play the video inline  or  see it on YouTube

Part of the 351 Windsor series.
Part of the Ford Engines series.

Want to see more like this? Subscribe to Bullnose Garage!

Show Transcript

Howdy folks, Ed here. Welcome back to Bullnose Garage. The 351 Windsor Ford small block engine is one of the most venerable engines that Ford Motor Company has ever produced. Today on Bullnose Garage, I’d like to introduce you to mine and talk a little bit about this engine and why I chose it for my build.

So let’s start this video off right by introducing you to the donor. The donor was originally a 1994 F-150 with an E4OD automatic transmission, two-wheel drive, and of course, the 351 Windsor. What follows is most of the research I’ve done on the 351 Windsor in preparation for swapping it into my truck. Keep in mind that I gathered almost all of this information from places on the internet, and none of it is personal experience because I don’t have any. That said, I’ve tried very hard to fact check and verify my information as best I can. I hope that this information, put together in one place, is useful for anyone looking for more details or thinking about swapping or building this small block Ford engine.

So what is a 351 Windsor? The 351 Windsor, or 351W for short, is the largest of the Ford small block engine family. Ford Motor Company built them between 1969 and 1996. It’s a 90-degree V8 with an overhead valve train. The 351 corresponds to the number of cubic inches displaced by the stroke of all eight cylinders during normal operation. It’s also commonly referred to as the 5.8 liter for the same reason. The name Windsor comes from where the engine was produced in Ford’s Windsor, Ontario casting plant. Similar in size and shape to the very common 302, the 351 is a taller block. This allows for more piston travel in the cylinder, increasing the cubic inches to accommodate the increased displacement and increased power. The 351 block castings are beefier in almost every respect.

The Windsor is one of three engines offered by Ford in the 351 displacement. There was also the 351 Cleveland and the 351M, often called the modified. The Windsor engine is by far the most common and had the highest production numbers. Ford produced about 8.6 million units at the Windsor plant. It also tends to be the easiest to find aftermarket parts for due to its sharing many parts with a 302 small block.

So let’s go over some stats and measurements. The 351 Windsor has a displacement of 351 cubic inches, or 5.8 liters. The stock stroke of the engine is 3.5 inches, and the stock cylinder bore is 4 inches. It has a distinct firing order from the other Ford small blocks: 1-3-7-2-6-5-4-8 versus 1-5-4-2-6-3-7-8. Cast out of iron, the bare block weighs in at between 150 and 200 pounds, depending on the year. Blocks older than 1974 are heftier by 25 to 30 pounds due to having more metal in the casting. Prior to 1971, the deck height reached 9.48 inches, and after ’71, it changed to 9.503 inches. Something to make note of if you’re rebuilding one of these engines, since the deck height will affect the compression ratio and the valve piston head clearance.

The stock engine uses two bolts to secure the main bearing cap to the saddle, known as two-bolt mains. Stock, the compression ratio was around 11 to 1 in 1969. Emissions restrictions caused the ratio to move as low as 8.8 to 1 in later years. Early 351W engines produced a maximum of 300 horsepower and found their way into Mustangs, Galaxies, Cougars, Country Squires, station wagons, Fairlanes, and Torinos. Later years were also installed into trucks, vans, and marine applications. Later engines had lower horsepower numbers and higher torque numbers as a result of vehicle requirements and emissions.

So the 351 Windsor’s got an interesting history. Ford began casting the Windsor in 1969 and produced them up until 1996. Prior to ’75, blocks were cast using green sand molds and pneumatic packers or vacuum pressure. These methods worked well but caused some issues with mold core shifting. This meant that Ford required more material in the block to meet minimum specifications. After ’74, Ford used better molding techniques, eliminating the need for the extra material. While it’s true that newer blocks are weaker than older blocks because of this material deficit, 351 blocks are still the strongest small block available and should be able to handle any streetable horsepower numbers. Still, for this reason, builders sometimes covet 351 Windsor blocks from ’69 to ’74 if they’re looking for very high horsepower torque members.

In 1971, Ford extended the deck height from 9.48 inches to 9.503 inches to lower the compression ratio. In ’74, they added a boss in the right front of the engine for an air injection pump. Also in ’74, the oil dipstick moved from the timing case to under the left cylinder bank. Until ’76, the block used 16 bolt holes for the intake manifold, but Ford changed it to 12 bolts from ’77 onward. It should be noted that the 351 has larger head bolt holes than the 302. This means that the same heads will fit, but a 302 head will need to be drilled out to accommodate this if it’s being used on 351. A popular example of this is the GT40 head used on higher performance 302 engines being swapped into a 351 for higher flow numbers.

In 1983, Ford modified the rear main seal from the old two-piece design to a more modern one-piece rear main seal. Very late in the engine’s production, in 1994, the design changed again to accommodate roller lifters and camshafts rather than flat tappet lifters and camshafts. This change, only available in the final two years of production, makes these blocks highly sought after. Often these are just called F4 blocks due to the casting number or simply referred to as roller blocks.

So here’s a quick chart that I put together so that I could see exactly what gears which blocks had which features. That way, when I’m looking to go pull a Windsor out of a junkyard or another vehicle, I know exactly what years to look for for the features that I want. The second chart is one that I made to reference which vehicles these blocks go in. That way, when I’m looking on Facebook or Craigslist or even at a junkyard, I know what kind of a block that I’m going to get out of which vehicle in which year.

Ultimately, the best way to identify a 351 Windsor block is by using the Ford casting number. We can break down the beginning of Ford’s casting numbers into decade, year, vehicle or vehicle type, and engineering division. A casting that starts with C90E was built in 1979 because the C signifies the ’70s, and the 9 is for the last year of that decade. The 0 signifies that it was built for a Torino, and the E stands for engine. Castings that start with D are built in the ’70s, E in the ’80s, and F in the ’90s. My block is an F4TE, which means it’s a 1994 truck engine block. As I said before, F4 blocks are known as the roller blocks. That casting identifies them as having been built after 1994 when Ford switched to roller cam capable blocks. Note that Ford didn’t install roller cams in all roller blocks from the factory; many still utilize the old style flat tappet cams even though they are roller capable.

Ford produced two or three, depending on who you ask, different 351 engines during the same time period: the 351 Windsor and the 351 Cleveland. Every now and then, you’ll also hear about the 351M, also called modified, or might even hear about the 351 HO, or high output. What gives with all these different motors with the same displacement? Well, the Cleveland and the modified are both based on the same engine, which is entirely different from the Windsor. They called it Cleveland because Ford cast them in their Cleveland, Ohio plant. The Cleveland is part of the 335 big block engine family and was designed for more performance with better flowing heads and a stronger crank. Physical differences include a recessed timing chain and 8-bolt valve covers versus the Windsor’s 6-bolt covers. The bolt covers are the easiest way to tell if you’re looking at a Windsor or a Cleveland.

The 351M is closer to the Cleveland than the Windsor but is basically a de-stroke version of the big block 400, a different block altogether with a taller deck height than either the Windsor or the Cleveland at 10.297. The M also shares a bell housing pattern with other members of the 335 big block engine family, while the Windsor and the Cleveland both use a small block bell housing pattern. The 351 HO is just a Windsor engine with higher performance parts. It came with a four-barrel carburetor and a larger cam. Ford put HO engines in some trucks in the mid-’80s.

The Ford 302, or 5.0 liter small block, is in the same family as the 351, and it can often be hard to distinguish the two. The 351 has a taller deck height and subsequently longer stroke, which accounts for the difference in displacement. The 351 is also a heavier casting with more material, making it a stronger block overall. The crank and rod journals are also larger in the 351, adding to crankshaft durability. Many of the parts for a 302 are interchangeable to the 351. This includes heads, cam, lifters, water pump, engine mounts, timing chain, timing cover, and many other parts. As stated before, it should be noted that 302 heads have smaller bolt holes, so they’ll only fit a 351 if the holes are drilled out. Earlier versions of the 351, until ’76, incorporated heads with more bolt holes and larger intake ports than the 302, though the exhaust ports always remain the same size. The bell housing bolts to both engines are also the same. This means that a transmission that pulls up to a 302 will also bolt up to a 351. The firing order between the two engines is different, as is the oil pan intake due to the deck height harmonic balancer, except pre-’81 302s which share the internal balance of 351W and distributor.

There are several ways to tell the difference between a 351 and a 302 by visual inspection. The easiest I found is to look at the distributor mount height. The mount will be near flush to the top of the block on a 302, while the 351 has the distributor mount sunk below the top of the block by around an inch.

So does the Windsor make a good high-performance engine? Well, 351 Windsor blocks upgrade easily. A huge number of aftermarket parts exist for both the 351 and the 302. Popular upgrades are the heads since the stock 351 heads are mediocre at best, and other standard upgrade parts like the intake, cam, headers, and fuel delivery system. While the latest generation of 351 Windsors typically generated about 180 to 220 horsepower from the factory, adding a new set of heads, a larger cam, and some other aftermarket parts can get a Windsor with a stock stroke to around 350 to 400 horsepower easily. Stroking the engine by changing the crank and piston rods can increase the displacement to 383, 393, 408, 418, or 427. Doing so makes horsepower numbers as high as 500 to 600 easily attainable. Even higher numbers are possible with the correct aftermarket parts or power adders. The maximum horsepower attainable through a stock 351 Windsor is a matter of debate. Most agree that 500 to 600 is easily and safely attainable without risking damage to even the later standard strength blocks. Earlier high-strength blocks regularly reach 800 to 1000 horsepower without damage. When it comes to cracking an engine block, though, often it’s not the horsepower numbers but the sturdiness and quality of the parts and build that’s most important.

So can a junkyard 351W make a good performance engine? Well, in my opinion, the junkyard OEM block is a fine base to use for a 351 Windsor build, provided you’re not planning on putting out more than 600 horsepower and redlining RPMs all the time. Much more than that wouldn’t be streetable anyway. If you really want to race the block and send massive amounts of power through it, then it might be worth your time to hunt down a pre-’74 block for the higher strength. But there’s always the option of purchasing an aftermarket block. Purchasing an aftermarket 351 block can help you attain higher numbers without the worry of block failure. 1200 plus horsepower is not uncommon for an aftermarket 351 Windsor. Several reputable companies make aftermarket 351 blocks.

So why did I choose the 351? Well, my ’85 Bullnose houses a 306 from the factory, but a small block engine option existed for my truck. Because of this, I know the small block form factor will fit without an issue, unlike a big one. I wanted an engine that would bolt right into my Bullnose just to keep things easier for my first swap. The 306 shares the same bell housing bolt pattern as the small block engines as well, so I have the option to keep my transmission. Engine mounting points between the 300 and small blocks are also similar, with only the need to pull the mounts and purchase from the donor and bolt them into the Bullnose. I chose the 351 over the 302 because there’s no replacement for displacement. I’ve also read that the 302 is far easier to crack when running high horsepower numbers. I’m not planning on getting numbers that high in my first build, but who knows where I’ll be down the road. It’s also easier to get more horsepower for less money out of a 351, all else being equal, simply due to the larger displacement to start with. Finally, the Ford small block platform in general has a vast array of parts and aftermarket support, meaning I can build the engine just about any way I want to, and I plan on it.

Why did I get this particular vehicle as a donor? Well, obviously, it’s got the 351, which is the engine that I was looking for, and it was a fantastic deal. I managed to get this chassis with the engine, transmission, and pretty much everything you see here for right around 500 bucks. Now, the people that had it before were going to use it for some kind of a hot rod project, but it turns out that the frame is bent right here. Now, I don’t care about the frame; I’m getting it for the engine, so that works out good for me. And the fact that it’s a ’94 means that it’s a roller block. Now, a roller block means that I don’t have to go out and get link bar lifters or some kind of retrofit kit if I want to get a roller cam. It’s not that big of a deal; it’s only a few hundred dollars, but it does save you that money.

This chassis has been pretty much sitting here ever since I bought it. I’ve done a couple of things to it. I pulled the gas tanks off and sold those. I fogged the engine, which I’ve got a video about how to do that, and I sold the steering column because when I bought it, I also got the steering column and a complete wiring harness with ECU and everything. So I’ll probably end up selling that too because I’m going to convert this from EFI to carbureted, so I don’t need that stuff. That’s just more money that I can put in my pocket to go out and buy cool stuff for the engine.

The best way to determine what the internals of an engine look like without actually tearing it apart is using something like this borescope camera. Now I’ve got it hooked up to my laptop up there, but you can use a tablet or usually even a cell phone to do this if you’re sort of out and about and don’t have access to a big old laptop like I do. So we’re just going to go ahead and stick this inside and take a look and see what the cylinders look like. Oh, I’ll sit down. Hello! All right, here we go. It’s actually really hard to see with the reflection in there. Let’s try a different cylinder here. So you can still see some of the cross hatching on the cylinder walls. Let’s take a look at another one. It’s kind of hard to get an idea of what you’re seeing here sometimes, but obviously that’s the top of the piston. Looks like it’s in pretty good shape there. There we go. Now it’s really hard to see out here in the daylight. I’ll take a better look at this once I get inside and look at it on the computer, but everything looks pretty good from this angle here. Well, there we go. Ah, there we go! Yeah, see, I’m not a mechanic, but to me that looks pretty good for a used engine, so I’m pretty happy with that.

One of the problems with using a borescope like this during the daytime is that it can be really hard to see on a screen like a laptop screen or your phone screen. I mean, unless you see some really egregious damage, which shows up right away, and then you know what you’re looking at, some of the stuff that you’re looking for can be kind of subtle. So just keep that in mind if you ever take a borescope out to the field.

Well, there you go. That’s the donor and the 351 Windsor insider. I hope you guys enjoyed this video as much as I enjoyed making it. I did a lot of research on these engines, and I just love digging into the history and all the information about them. I was super stoked when I managed to get a hold of this one. I just can’t wait to tear it apart, see how it looks on the inside, and get it rebuilt and into the old truck and see how it runs. Man, there’s just so much to look forward to with this, and I can’t wait to get my hands dirty on it. Hopefully, I can do a good job and not blow it up or have any major issues, but you know, that’s part of the adventure too, so we’ll see how that goes. Hopefully, you guys will be along for the ride, and I can’t wait to get out more videos about it and see where this takes me. As always, if you have any questions, comments, concerns, gripes, internet ramblings, stick them below. Thanks again so much for watching, guys. We’ll see you next time.

Hey folks, Ed here from Bullnose Garage. If you’ve ever wondered why gearheads like me are so smitten with the Ford 351 Windsor, let me introduce you to my new obsession—this beast of an engine. In this post, I’m breaking down everything you need to know about the 351 Windsor, from its history and specifications to why I picked it for my build.

Meet the Donor

Let’s kick things off by introducing you to my donor vehicle. It’s a 1994 F-150 with an E4OD automatic transmission and a two-wheel drive setup. But the star of the show here is, of course, the 351 Windsor. I managed to snag this setup for about 500 bucks, which, considering the treasure under the hood, is a steal. The previous owners intended to use it for a hot rod project but bailed when they discovered a bent frame. Lucky for me, I’m just after the engine, so everyone wins.

What is a 351 Windsor?

For the uninitiated, the 351 Windsor, or 351W, is a member of Ford’s small block family, produced between 1969 and 1996. This 90-degree V8 engine is named after Ford’s Windsor, Ontario plant where it was cast. It’s got a 351 cubic inch displacement, or 5.8 liters, and it was designed to offer more power than the commonly known 302, thanks to its taller block allowing for more piston travel.

Specs and Measurements

The Windsor is a beefy block that stands out for its durability. It features a 3.5-inch stroke and a 4-inch bore. Blocks made before 1974 are particularly robust due to extra casting material—they’re about 25 to 30 pounds heavier than their post-’74 counterparts. If you’re planning a rebuild, note that deck heights differ by year, affecting compression ratios and valve clearances.

A Brief History

Ford rolled out the Windsor in ’69, and it had a good run until ’96. Early models were cast using older techniques that required more material, making them stronger—a detail that makes those early ’69 to ’74 blocks highly sought after by builders aiming for high horsepower applications. Over the years, Ford made tweaks to improve emissions and accommodate new technology, like the switch to roller lifters in 1994.

Windsor vs. Cleveland vs. Modified

Ford offered a few 351 flavors: Windsor, Cleveland, and Modified (or 351M). While they share the same displacement, they’re vastly different engines. The Cleveland was designed for performance with better heads and a stronger crank, while the Modified is essentially a de-stroked big block 400. The Windsor, however, remains the most common and user-friendly for swaps and builds.

Performance Potential

The Windsor is a solid candidate for performance builds. Stock, it churned out around 180 to 220 horsepower, but with some aftermarket love—a new set of heads, a larger cam—you can easily push it to 350-400 horsepower. Want more? Stroke it to boost displacement and you’re looking at 500-600 horsepower, no sweat. Just remember, a pre-’74 block can handle more power than later versions.

Why I Chose the 351 Windsor

So why did I pick the 351 Windsor for my Bullnose project? Well, my truck originally came with a 300 inline six, and I wanted something that would bolt right in with minimal fuss. The 351 offers more displacement and, consequently, more power potential. Plus, it’s got a robust aftermarket scene, making it versatile for future upgrades. And let’s be honest, who doesn’t love a good V8 rumble?

Inspecting the Engine

To get a peek inside without tearing it apart, I used a borescope. It’s a nifty tool that lets you inspect the cylinders and pistons, and from what I could see, everything looked pretty good. Sure, it was a bit tricky to see in the daylight, but overall, I’m happy with the engine’s condition.

Conclusion

There you have it, folks—a deep dive into the 351 Windsor. Whether you’re considering a swap or just curious about Ford’s iconic V8, I hope this breakdown helps. As always, I’d love to hear what you think, so drop your thoughts in the comments. Stay tuned for more updates as I get down and dirty with this build.

Check it out above, and as always, let me know what you think!


Bullnose Garage at YouTube

If you want more specific information on Bullnose Ford Trucks, check out my YouTube Channel!

For more information on Bullnose Fords, you can check out the BullnoseFord SubReddit or Gary’s Garagemahal. Both are excellent resources.

As an Amazon Associate, I earn from qualifying purchases. If you see an Amazon link on my site, purchasing the item from Amazon using that link helps out the Channel.

Published on October 19, 2020

Click to play the video inline  or  see it on YouTube

Part of the Tips & Tricks series.

Want to see more like this? Subscribe to Bullnose Garage!

Show Transcript

Howdy folks, Ed here. Welcome back to Bullnose Garage. If you’ve got an engine that you’re going to have stored for a long time, such as this 351 Windsor that I’ve got here behind me, then one of the things that you need to worry about is the top end getting moisture inside and causing rust, corrosion, or potentially even seizure of the engine.

One of the best ways to prevent that is called fogging the engine, and that’s what we’re going to talk about here today on this Bullnose Garage quick tip. Fogging your engine is a very simple procedure that simply involves taking some oil, typically it’s called fogging oil, and coating the top end components to make sure that water doesn’t get in there and touch those metal parts and cause rust, corrosion, and maybe even seizing of the engine.

If you have a carbureted engine that runs, fogging it is actually really simple. All you’ve got to do is start the engine up, take off the air cleaner, spray some of this down inside for 10 to 20 seconds, or until you see smoke start to come out the exhaust. That’s actually where the term fogging the engine came from, is the smoke that comes out of the exhaust when you do it this way, and that’s going to let you know that this stuff has gone through the entire engine, it’s starting to burn off, and you can shut the engine down at that point so you don’t burn all this off, and you’re pretty much done at that point.

You may want to go ahead and take out the spark plugs and spray some of this down into the spark plug holes for two or three seconds per cylinder, and then at that point you should be good to go.

If you’ve got an engine that’s not running or is fuel injected, then you can’t fog the engine this way. Of course, if it’s not running, you can’t do it that way because it’s not running. If it’s fuel injected, you shouldn’t fog it that way because this stuff can foul up the injectors or cause some sensor issues. So if you have an engine that’s in either one of those situations, the way you’ve got to do it is manually, and I’m going to show you how to do that.

The first thing you’re going to want to do is go and take out all of your spark plugs. So once all the spark plugs are out, then you can go cylinder by cylinder and spray a shot of fogging oil into each cylinder for about three or four seconds.

Now that we’ve taken all the spark plugs out and I’ve sprayed fogging oil down all the cylinders, if I had access to the intake, I’d probably go ahead and spray some down to the intake for two or three seconds to get that part good and coated, and I’d do the same thing for the exhaust if I had access to the exhaust ports. Now, I don’t have access to either one of those in this engine. I’m certainly not going to be taking off the exhaust manifolds or the intake out here, certainly not this evening anyway, so we’re not going to worry about that. The important point is to get this stuff down into the cylinders.

Once you’ve got everything fogged up, you’re going to want to go ahead and turn the engine over manually a few times with a ratchet or a breaker bar to get that stuff in there really circulated around into the pistons, piston rings, the cylinder walls, make sure it’s good and coated. Now, in a Windsor 351, it’s going to be a 15/16 socket, but it could be different depending on your engine. Now, I’m just using a regular ratchet because this engine turns over real easy.

So is fogging your engine really worth the time and trouble to do it? I’ve heard both sides. I’ve heard some folks say that unless the engine is going to sit for years and years and years, it’s really kind of a waste of time. They’ve never seen an engine be rusted out or seized just over a couple of seasons. And other folks say that it’s so easy and simple and cheap to do, why would you not do it? It’s just cheap insurance. Now, I gotta tell you, I’m all for cheap insurance.

Now down here in the southwest, it’s probably not that important because it doesn’t get that humid down here, although during the fall and the spring, there are some pretty big temperature gradients that can cause condensation. But it still wouldn’t be nearly as important as it would be in a more humid area like the coast or down in the south, southeast of the country. The bottom line is that fogging your engine is easy, quick, and cheap, and I am all for easy, quick, and cheap ways to sleep better at night.

As always, if you have any questions, comments, concerns, gripes, internet ramblings, stick them below. Thanks again for watching, and we’ll see you next time.

Hey folks, Ed here from Bullnose Garage. Today, we’re diving into a nifty little trick to keep your engine in top shape when storing it for the long haul. If you’ve got a classic 351 Windsor or any other carbureted engine that’s going to be sitting idle, then you’ll want to stick around to learn about engine fogging. It’s a simple, cheap, and effective way to avoid the nightmare of rust and corrosion.

Why Fogging is a Must for Idle Engines

When an engine sits around without running, particularly through those long winter months, the oil tends to settle down into the pan. This leaves the top end parts like pistons, rings, and valves exposed and vulnerable to moisture. And we all know moisture is the arch-nemesis of metal, leading to rust, corrosion, and potentially, an engine that’s seized tighter than a drum.

Engine fogging is a preventive measure that involves using a specially designed fogging oil to coat these components, creating a barrier against moisture. Think of it as giving your engine a raincoat for those long, non-running seasons.

How to Fog a Carbureted Engine

Let’s break down the process of fogging a carbureted engine that’s still in running condition. First, fire up the engine and remove the air cleaner. Next, spray fogging oil into the carburetor for about 10 to 20 seconds, or until you see smoke billowing out of the exhaust. That smoke is your signal that the oil has made its way through the engine, coating everything it needs to.

Once you’ve got your smoke show, shut the engine down. You can also remove the spark plugs and give each cylinder a quick spray of fogging oil for added protection. A couple of seconds per cylinder will do the trick.

Fogging Non-Running or Fuel-Injected Engines

Now, if your engine isn’t running or it’s fuel injected, the process changes a bit. Running fogging oil through a fuel-injected engine can mess with the injectors and sensors, so we’re going manual. Start by pulling all the spark plugs. Once they’re out, spray some fogging oil into each cylinder for a good three to four seconds.

If you can access the intake and exhaust, give those areas a quick spritz too. But let’s be real, if you’re not up for taking apart your engine, just make sure the cylinders are coated, and you’ll be fine.

Is Fogging Really Worth It?

The big question: is fogging worth your time and effort? Opinions are split. Some folks argue that unless you’re storing the engine long-term, there’s no point. Others say it’s cheap insurance, and why not do it if it’s easy and inexpensive?

In drier climates, like down here in the southwest, it might not be as crucial. However, in more humid areas, fogging can be a lifesaver. With the possibility of condensation forming during temperature changes, it’s a straightforward way to ensure your engine doesn’t turn into a rusty relic.

Conclusion

Fogging your engine is one of those maintenance tasks that’s so simple and cost-effective, it just makes sense. Why take the risk when a few squirts of oil can help you sleep better at night?

As always, if you’ve got questions, comments, or just want to share your own engine adventures, drop a line below. Thanks for tuning in, and until next time, keep those engines running smooth.

Check it out above, and let me know what you think!


Bullnose Garage at YouTube

If you want more specific information on Bullnose Ford Trucks, check out my YouTube Channel!

For more information on Bullnose Fords, you can check out the BullnoseFord SubReddit or Gary’s Garagemahal. Both are excellent resources.

As an Amazon Associate, I earn from qualifying purchases. If you see an Amazon link on my site, purchasing the item from Amazon using that link helps out the Channel.

Published on October 15, 2020

Click to play the video inline  or  see it on YouTube

Part of the The Garage series.

Want to see more like this? Subscribe to Bullnose Garage!

Show Transcript

Howdy folks, Ed here. Welcome back to Bullnose Garage. Organization is hard, especially for me. How am I gonna make sense of all this stuff? My first task was to lay out all my tools and miscellaneous equipment so I could see what I had. Some of this stuff has sat in my toolbox for years. As a matter of fact, I found several things I didn’t even know I had.

Oh, once I got everything set out and sorted, I could work on putting it all away in the right places. I needed to do just a little shadowing on my toolbox, which you’ll see in a minute. But otherwise, it was pretty straightforward and boring, which is why I won’t subject you to it. I’ve just started putting things away, and I’ve discovered a problem already, which I’m sure is a problem for a lot of folks. I got a real nice socket set here and a nice socket set here, and they’ve got nice holders. But then I got all this junk over here: ratchets, some more sockets, some loose impact sockets here, and some of this weird stuff and extensions, and it’s all just kind of hanging out. So I really want to get this organized.

And I’m going to take a cue from the Air Force, and I’m going to do—I’m going to shadow my tools. But I don’t really feel like buying the shadow foam because it’s really expensive, and I actually happen to have something here that I can use that’s just been laying around. I’ve got this flooring, and I wasn’t sure what I was going to use it for, you know, probably for cushioning on the floor. Got it from Sam’s not too long ago for a really good price; they had it on sale. But I looked at it and figured, you know, this would be perfect stuff for shadowing my toolbox. I’m not going to shadow everything; I don’t need that crazy level of inventory or detail. But it is really going to help to contain some of those loose items that are rolling around in there.

So what I’m going to do is I’m going to cut all the little puzzle pieces off the edges of this, measure it out, cut it to fit, and then start cutting slots for my tools. Let’s see what I got here. It’s about, say, ten and three quarters by sixteen and a half. I’ve decided that I’m going to consider this piece a practice piece, and here’s why. I didn’t lay all this out before; I just started cutting it. And what I’ve discovered is these tools take up a whole lot more room when you shadow them like this than they normally would in your toolbox. So I thought I had plenty of room for all of this stuff, plus even some other sockets, and that’s just not the case.

So what I’m going to do is I’m going to move some of this stuff to a different drawer and decrease the spacing between these pieces so that I get a little bit more in this one piece. The other thing that I’ve noticed is that it’s actually really hard to cut a straight line, even with a real nice precision knife set. So you just have to take your time and be careful and go through. Now this stuff is flooring; it’s not made for this, but it does cut okay with this knife. So we’re going to redo this and hopefully get a better result.

And here we are, my first time ever shadowing my toolbox. The cuts are pretty gross, and it was a lot harder and took a lot longer than I expected, but it does the job. And there you go. Hindsight being what it is, I probably would have moved this stuff up a little bit closer to the front so that I could reach back here. But I can still get to this stuff, so it’s not that big a deal. 75 years later, that took longer than I expected. But at least the garage is organized, and I got some cool stuff left over that I was able to use to make up some very useful things.

So let’s take a look. I got this rolling cart a few years ago from my in-laws for Christmas, and it’s pretty cool and was a great gift, but I never really had any use for it until now. With some of the leftover tools that I found and stuff that wouldn’t go anywhere else, I was able to make up a little go box for going to the pickup parts. So I can put any kind of tools in here that I would need to use to pull bits and pieces off of trucks in the field. And now all I gotta do is load this box up in the truck and go. Typically, little boxes like this are used to store medical supplies, but I’m using it as a go box for electrical supplies. So if I have to do any electrical work out in the field or just do a real quick electrical joint, I’ve got all my cutters and snips and fuses. And on the other side of this thing here, I’ve got all my connectors and butt connectors and that kind of stuff. So if I got to do electrical repair out in the field, this could come in handy.

One item that will not be going out in the field with me ever is this toolbox. This toolbox belonged to my grandfather, and now I can use it for simple around-the-house repairs and hanging pictures on the wall. One of the huge problems that I had was having nuts and bolts and washers and screws scattered here, there, and yonder all over the place. So what I decided to do was to go out and get some of these little compartmentalized boxes. Now these here are from Jackson Palmer, actually, and they’re not sponsoring this video or anything. I actually went and bought this with my own money. They actually already come with metric, SAE, and metal and wood screws in the boxes, but I also got an extra one that was empty so that I could put my own stuff in it.

What I managed to do was go through all of these screws that I already had laying around and find in these compartments where the ones that I already had matched what came in these boxes and then fill these compartments up even more with the stuff that I already had. And then anything that was weird or didn’t match, I could put inside of this empty container. And then I also have some spots over here that are sort of random compartmentalized boxes I had laying around for weird things that don’t really fit anywhere else. And all of this stuff goes in my storage unit over there.

I said this before in my garage video that I got these storage units from Public Surplus. Again, not being sponsored; I just love Public Surplus. It is a fantastic place to go to get really cheap stuff. All of these black cabinets, this gray cabinet over here, and the gray cabinet back over here came from Public Surplus, and I think I got each of them for like 15. They came from a university, and they were file storage cabinets, so they work perfect for storing tools and bits and pieces that don’t fit in my toolboxes to help me keep things organized.

I went onto Amazon and bought some of these little dry erase strips that are magnetic that I can just stick right onto my shelving and know exactly what’s inside of there. And all you got to do is just take a dry erase marker, write what you want on there, and stick it on. And if you ever want to change anything, you can just wipe it off. Easy peasy. These are really cool.

Well, there you go. What was probably a pretty short video for you was a week-long adventure for me. But at least now everything’s organized. It’ll be up to me to keep it that way. I don’t have a great history of that, but we shall see. As always, if you have any questions, comments, concerns, gripes, internet ramblings, stick them below. Thanks for watching, folks. We’ll see you next time.

Hey folks, it’s Ed from Bullnose Garage. I’ve got a confession to make: I’m a bit of a disaster when it comes to keeping my garage organized. Tools everywhere, random parts lying around—you name it. But with the garage renovation finally wrapped up, it was time to tackle the chaos head-on. I dove into a week-long adventure of sorting, shadowing, and labeling, and I’m here to share the gritty details with you.

The Starting Mess: Tools Everywhere

You know when you open your toolbox and find stuff you didn’t even know you owned? That was me. My first task was laying out all my tools to see what I had. It turns out, some of these tools had been hiding in my toolbox for years. Once everything was set out, I realized the enormity of the task. I had a mix of nice socket sets with holders and a bunch of loose junk—ratchets, sockets, weird extensions—you get the picture. Organizing it all was priority number one.

Shadowing the Toolbox: A DIY Approach

I decided to take a cue from the Air Force and shadow my tools. Shadow foam is expensive, and I’m not about to spend my hard-earned cash on that. Instead, I used some flooring material from Sam’s Club, originally intended for cushioning. It’s not perfect, but it’s cheap and does the job. I cut the flooring to fit my toolbox, creating slots for my tools. It wasn’t easy—cutting straight lines is more challenging than it sounds, even with a decent knife. After some trial and error, I managed to get it done. Granted, the cuts are a bit rough, but they work.

Organizing Loose Ends: Compartmentalized Boxes

Nuts, bolts, screws—they were scattered everywhere. To tame this chaos, I picked up some compartmentalized boxes from Jackson Palmer. They come preloaded with metric, SAE, and wood screws. I also got an extra empty box to fill with my existing collection. Anything that didn’t match went into this box, giving me a neat solution for my hardware mess.

My Secret Weapon: Public Surplus Finds

I’m not sponsored by Public Surplus, but I should be. It’s a goldmine for cheap storage solutions. I managed to snag black and gray cabinets for a song—about fifteen bucks each. Originally file storage cabinets from a university, they now hold tools and bits that don’t fit in my toolboxes. These cabinets are a game-changer for keeping things in order.

Magnetic Labels: Easy and Effective

To top it all off, I grabbed some magnetic dry-erase labels from Amazon. They stick right onto my shelving, and a dry-erase marker lets me label everything easily. If I need to change it up, a quick wipe and rewrite does the trick. These little guys are surprisingly handy.

Wrapping It Up: A Week Well Spent

So there you have it—what might have been a short video for you was a week-long saga for me. My garage is finally organized, and the trick now is keeping it that way. I don’t have the best track record, but hey, hope springs eternal. If you’ve got any questions or just want to share your own garage horror stories, drop a comment below. Thanks for sticking around, and I’ll catch you in the next one.

Here are some of the items or locations mentioned in the video:
Public Surplus: https://publicsurplus.com
Magnetic Dry Erase Labels: https://amzn.to/3nSFhhN
Loaded Hardware Boxes: https://amzn.to/37d3b1x
Empty Hardware Box: https://amzn.to/3lHdcIq


Bullnose Garage at YouTube

If you want more specific information on Bullnose Ford Trucks, check out my YouTube Channel!

For more information on Bullnose Fords, you can check out the BullnoseFord SubReddit or Gary’s Garagemahal. Both are excellent resources.

As an Amazon Associate, I earn from qualifying purchases. If you see an Amazon link on my site, purchasing the item from Amazon using that link helps out the Channel.
Bullnose F150

Published on October 9, 2020

Click to play the video inline  or  see it on YouTube

Part of the The Bullnose F-150 series.

Want to see more like this? Subscribe to Bullnose Garage!

Show Transcript

Howdy folks, Ed here. Welcome back to Bullnose Garage. What is a bullnose and why do I have one? A bullnose is a Ford truck built from the years 1980 to 1986, like the one behind me. This one here is a 1985 F-150. Bullnose trucks are F-150, F-250, F-350, or Bronco, anywhere from ’80 to ’86. And why are they called a bullnose? Well, because the front of the truck looks kinda like a bull’s nose, if you imagine.

So why do I own a bullnose? Well, it’s a project truck for me. I’ve always loved Ford trucks. In fact, my daily driver is a 2007 Ford F-150, so the F-150 platform is something I know and love very much. And I wanted something older that I could work on, something carbureted, something that was easy for me to sort of sink my teeth into and learn how to rebuild engines and do all the kind of mechanical stuff. See, my entire life I’ve been a computer guy. I write programs for a living, so I never really worked very much with my hands. And I thought, what better way to get my hands dirty than to do it on an old Ford truck? So, my project.

So why did I choose this particular truck? After all, I had to drive all the way to San Antonio, Texas, to pick it up. Well, I couldn’t find any trucks like what I was looking for around here. So what does that mean? Well, first of all, as you can see, it’s in pretty good shape. The paint’s a little faded, but there’s no rust, and the body is really straight. So that’s one thing. Another thing that’s pretty obvious is that it’s a short bed. Now, I was looking for a short bed because I want a truck that’s going to be a little bit sportier, because I’m planning on putting a few more horses under the hood and making like a little street truck out of it. Now, I’m not going to do any kind of racing or anything, but what I’m going for would be better with a short bed, so I wanted to make sure I got one of those.

It also runs really well. I basically could just drive it right out of the box, except for the fact that it’s a manual. So I knew I wanted a manual because I’d never driven a stick shift before in my life. And I figured, what better way to learn how to drive a stick than to buy a vehicle that I can’t drive unless I know how to drive a stick? So I had to teach myself, and that’s what I did. And I’m glad to say that it works. I can now drive a stick shift. At least I can drive this stick shift.

The last thing that I wanted to make sure that I had, no question, was air conditioning. I mean, because come on, I live in New Mexico, and it is hot as in New Mexico. Let me go ahead and start her up, and I’ll let you take a listen. The engine in this truck is an inline six, and it’s got an NP 435 manual transmission. That’s a four-speed, but it’s effectively a three-speed. The first speed is granny low. I mean, I could throw this thing into first gear, get out, and walk alongside it. So you basically never use first gear in a truck like this.

Even though I pretty much just started my channel last month, I’ve had the truck for a couple of years, so I’ve had some opportunity to do just a little bit of work to it. So let me just briefly go over some of the stuff that I’ve already done. I’ve changed all the fluids, including this stuff. I’ve replaced both side mirrors. I’ve replaced the door and window seals, and I replaced the door striker. I’ve repositioned the license plate so the tailgate doesn’t smack it when it comes down. I’ve changed the battery twice. I have replaced the alternator. I replaced my marker lights and updated the blinkers. I replaced my tail lights. I’ve wrapped the steering wheel, and I’ve replaced the rear view mirror. I added LED dash lights and LED interior lights. I let someone from Craigslist load something into the back of my truck with a forklift and bend the bed. So that’s my bullnose.

But I’m not done. I mean, I started this channel with the intent of making videos for people who may have a similar truck or similar interests, and mostly because I’ve never done this before. And this is all gonna be a learning experience for me. And so I’m kind of hoping that by going through this and having a learning experience that, uh, if I film it, maybe I can help some other folks. So let’s talk about what my plans are for the bullnose and for this channel, and I got a whole bunch of them.

So obviously the big deal is a new engine. The truck right now has a 306. It’s an inline six. These motors are bulletproof, and there’s going to be a lot of people, a whole lot, that are going to tell me that I shouldn’t swap the motor, that the 306 is one of the greatest engines that Ford ever made, and it’s ridiculous to pull a perfectly good running 306 out of a truck and put in something different. But a 306 is not the engine that I want for my application. What I want is something with a little more punch. So what I’m putting in there is a 351 small block, and I actually already have one, but that’s a future video. Eventually, I would like to stroke it, probably to 408, and get between 400 and 500 horsepower. But that’s a long ways down the road. I think to begin with, I’m just going to go ahead and do a regular engine rebuild, and I might put a couple of power adders on there, but I haven’t quite decided what I’m going to do with that just yet.

And of course, um, I’m going to do basically everything that I can to make the truck as nice as possible. So we’ll do some interior work. I’m going to work on the interior molding, make it look nice. I’m not sure exactly what I’m going to do, if I’m going to spray paint it or if I’m going to wrap it with some kind of fabric or, you know, what I’m going to do there. I do know I want to put some kind of sound deadening on the inside. I do want to add carpet. Right now it’s just that old rubber mat on the ground. I want to take care of that. I’m going to have to reupholster the seats or get real nice seat covers, but I think I’m probably going to end up reupholstering.

Um, so I’m also going to do a lot of electrical work. When I inherited the truck, well, when I purchased the truck, whoever I inherited it from did some questionable electrical work, so I need to go in and take care of some of that. I’m going to replace the headlights with probably LED headlights, and eventually I’ll be putting in a stereo system, probably putting speakers in the door panels and adding things wherever I can figure out how to add them. I might try to put a double din radio in there. I’m not quite sure yet. I’ve got an extra dash piece, um, bezel for the radio, so just, uh, I screw it up, I’ve got an extra, so we might try that for an episode.

Um, I gotta change the horn. The horn that’s in it right now is stupid. Maybe one of these times I’ll honk it for you and let you hear it. It’s wearing, it’s really terrible, so I want to upgrade the horn. Um, at some point I may paint the truck. I’m not sure if I have the ability to actually spray paint a vehicle, but I think I’d like to try. I’ve watched a lot of videos on it. I’ve seen a lot of instructional videos and read a lot of websites and forums and stuff. And, uh, we’ll get it sanded down and strip back probably to metal and put some primer on it and get sanded and do all the blocking and everything else and then pick a color and maybe paint it.

I’ve also thought about putting vinyl on it in terms of like a vinyl wrap, although I wouldn’t wrap the entire truck, but I might wrap parts of it rather than do a two-tone paint job because I’m not sure I could pull off a good two-tone paint job, especially since I’ve never painted a vehicle before. I’ve thought fleetingly about doing a crown vic swap. So for older Ford trucks, especially older ’79 or older, the generation before mine, a lot of guys put crown vic front ends in them from 2002 and forward Crown Victorias because they basically just bolt right in, and they’re more of a car suspension, so they handle power much easier and they ride much better. You can do a crown vic swap on a bullnose. It’s a lot more work than, um, it’s called a dent side from the earlier generation up to ’79, but it can be done. So I’m thinking about that.

Regardless of whether I do that or not, I’m going to have to upgrade the suspension on the truck just because it’s a little sloppy, and I’m putting a little bit heavier engine in there, and it’s going to have more power, so I want to make sure that I’m not falling down on my suspension. Um, I’ve thought about upgrading the transmission. A, uh, NP435 isn’t exactly a race transmission. Not that I’m gonna be racing it, but it’s a very solid truck transmission that drives like a truck, and it could probably handle four or five hundred horsepower as long as you’re not working it too hard. But what I’d really like to have is the ZF5. The F5 transmission is a heavy-duty, still a truck transmission, but it’s a five-speed with overdrive. And, uh, the fact that my truck doesn’t have overdrive right now is rough, um, especially on the interstate, you know, going 65, 70 miles an hour, it’s spinning pretty high. So I’d really like to have an overdrive transmission.

If I had all kinds of money, I’d go out and get a TKO transmission and, you know, put one of those in there, but they’re big bucks, so we’ll see what happens. And I’ve also thought about maybe changing the rear end, uh, getting a locking differential or changing the gears. Um, to be honest with you, I don’t remember exactly what the gears in there are right now. I’d have to look it up. I have it written down somewhere, but I’ve thought about changing the gears and doing a gear swap in the back and adding a locking differential. Obviously, I’ll be upgrading the tires and the rims. In fact, that’s probably coming in the next couple of weeks, and, uh, I’ll be doing things here and there to spruce the truck up and, uh, just make it better overall.

So I’ve got a lot of plans, and hopefully they pan out, and hopefully you guys get to see them because I’m really excited about doing all this stuff on camera and, uh, getting some of this stuff out there, especially when it comes to the engine. I’ve got some really interesting ideas as to what I might do in terms of, you know, pistons and heads and camshaft and that kind of stuff and how I’m going to get to the horsepower numbers that I eventually want to get to. Um, thinking about maybe using some cheap eBay parts just to see how they work. I mean, I’ve got a donor engine, so if I blow it up, then, well, I mean, I still got the original 306 I could drop back in if I had to, or, you know, 351 ones aren’t that hard to find in that junkyard somewhere. So yeah, I may have a little bit of leeway to screw up. I mean, it’s my first engine build ever. I’ve never even worked in a small engine before, so, um, I may be biting off more than I can chew, but hey, you know, that’s part of the channel. That’s, uh, that’s part of what we’re doing here.

All right guys, there you go. That’s a bullnose. That’s my bullnose. That’s what I’ve done, what I plan to do, my plans for the channel, all that stuff. So if you have any questions, comments, concerns, gripes, internet ramblings, stick them below. As always, thanks for watching guys. We’ll see you next time.

If you’ve ever wondered what makes a Bullnose Ford special, then you’re in the right place. Welcome back to Bullnose Garage, where I take you through my 1985 F-150 Bullnose project truck. Why do they call it a Bullnose, you ask? Well, take a look at the front end of these trucks, built between 1980 and 1986, and you’ll see why the name fits—they’ve got a front that resembles a bull’s nose.

Why I Chose the 1985 F-150 Bullnose

I picked up this beauty because I wanted to dive into something carbureted, something I could really get my hands dirty with. After all, I’ve been a computer guy most of my life, so why not transition from coding to carburetors? This particular truck was quite the find—I had to drive all the way to San Antonio, Texas, to get it, but it was worth it. It’s in pretty good shape, with no rust and a straight body, though the paint is a bit faded.

Short Bed and Manual Transmission

One of the main reasons I went for this specific model was its short bed. I’m aiming for a sportier look, something that could handle a few extra horses under the hood. And let’s not forget the manual transmission. Yep, I taught myself to drive stick just for this truck. What better way to learn than by necessity?

The Engine Situation

Currently, the truck is running on a 306 inline six with an NP 435 manual transmission. The engine is tough, but it’s not the power plant I want for my street truck project. I’m planning a swap to a 351 Windsor small block. Eventually, I’d even like to stroke it to a 408, aiming for that sweet spot between 400 and 500 horsepower. But for now, a standard rebuild with maybe a couple of power adders will do the trick.

Mods and Upgrades: What I’ve Done So Far

I’ve already tackled quite a bit, considering I only started the channel last month but have had the truck for a couple of years. From changing fluids and replacing mirrors to updating lights and repositioning the license plate, I’ve been busy. I’ve done some interior work too, like wrapping the steering wheel and adding LED dash lights. Let’s just say I’ve had my fair share of Craigslist adventures, including a forklift mishap with the truck bed.

Future Plans: It’s All About Upgrades

The big-ticket item is, of course, the engine swap. But that’s not all. I’m planning on redoing the interior with new molding, sound deadening, and possibly reupholstering the seats. I’ve got some electrical gremlins to chase down, thanks to the previous owner’s questionable wiring.

Suspension and Transmission

Suspension upgrades are also on the horizon, especially since I’m eyeing a heavier engine. I’ve considered a Crown Vic swap, which is a popular mod for older Fords, but that’s a decision for another day. As for the transmission, while the NP435 is rock solid, I’m dreaming of a ZF5 for its overdrive capability.

The Aesthetic Side

Visually, the truck could use a refresh. Whether that means a full paint job or a vinyl wrap, I haven’t decided yet. And don’t worry, I’m planning on replacing that embarrassingly feeble horn.

Wrapping It Up

There you have it, folks. A peek into the world of my 1985 F-150 Bullnose and the plans I have for it. If you’re as excited as I am to see how this project unfolds, stick around. Feel free to drop any questions or your own Bullnose stories in the comments below. Until next time, happy wrenching!


Bullnose Garage at YouTube

If you want more specific information on Bullnose Ford Trucks, check out my YouTube Channel!

For more information on Bullnose Fords, you can check out the BullnoseFord SubReddit or Gary’s Garagemahal. Both are excellent resources.

As an Amazon Associate, I earn from qualifying purchases. If you see an Amazon link on my site, purchasing the item from Amazon using that link helps out the Channel.

Published on October 6, 2020

Click to play the video inline  or  see it on YouTube

Part of the The Bullnose F-150 series.
Part of the Tips & Tricks series.

Want to see more like this? Subscribe to Bullnose Garage!

Show Transcript

Hey folks, Ed here. Welcome back to Bullnose Garage. Today we are on the way to, uh, pick up some parts. Anybody who’s done any vehicle restoration, especially of an older vehicle, knows that parts are very important. In fact, they’re one of the hardest parts of restoring a vehicle. So actually, the parts that I’m going to pick up today are some interior parts for the inside of the Bullnose: um, door pillars, visors, and actually, uh, the whole dash piece. It’s not the gauge or any of the trim, but it’s the actual dash, big plastic piece itself. And, uh, you can’t find those. You can’t buy them online anymore. They don’t even reproduce them. So the only place to get them is from old vehicles. And I happen to have somebody here in town who does sort of the same thing that I do, and he goes out and gets old vehicles, tears them down, strips them for parts, and then sells those parts on Facebook Marketplace, which is where I found him. And he’s already got the parts to our part. All I got to do is go pick them up. So that’s what I’m doing now.

As anybody who’s done an old vehicle restoration can tell you, sometimes the hardest thing is parts. In fact, I would wager a guess that the hardest thing is parts. Not just sometimes. A lot of these old vehicles, some parts you can get reproduced, but a lot of them you can’t. Again, in my case, I can’t find these door pillars, and the ones in my truck aren’t that bad, but they’re cracked. And if I wanted to try to repair that, I’d have to, I don’t know, do some plastic work or fiberglass or something, and I don’t want to do that. It’s much easier for me to find the parts that come out of another truck. Now, you can sometimes go online to find these parts, places like LMC Truck for this particular truck or CarParts.com, used to be JC Whitney. Sometimes you can get them from eBay. Sometimes you can get them from Amazon, although you don’t usually get the older parts from Amazon. But so far, my best resource has actually been the guy I’m going to see right now.

So if you can somehow forge a relationship with somebody in your area that has the kind of part that you need, then you’re golden. You can always go to a pull-apart. In my area, there’s not a whole lot of pull-aparts around. Now, there’s a lot of yards that have old vehicles, but they don’t advertise, and you have to just kind of drive up and hope that somebody’s there. And the pull-apart parts don’t tend to have vehicles that are as old as my Bullnose. Sometimes they do, but you got to get in there really quick. So again, I have found that the best place really is Facebook Marketplace. Another great option that you have, and one that I will almost certainly use, is finding a parts vehicle. That is, finding a vehicle that is the same general make and model as the one that you’re trying to restore. In my case, it’s an ’80 to an ’86 F-150, 250, 350, or maybe a Bronco. Finding one that’s going for a cheap price because either it doesn’t run or it’s got some other kind of a mechanical issue, and you load that thing up on a trailer, you tow it home, and then you can scavenge the parts that you need out of that. In a lot of cases, that’s going to be about the only place that you can find the kind of parts that you’re going to need. And if you’ve got a vehicle that’s more or less complete that way, then you can pull everything off of it, and then whatever you don’t need, you can sell.

For me, I’m both lucky and unlucky to live where I live. I live in the Southwest, so vehicles don’t really rot down here. They last forever. You know, the truck that I have is from ’85, doesn’t have a spot of rust on it. A whole lot of vehicles you see driving around are really old and vintage because they just don’t rust down here. But that does mean that the interiors wear out, and also especially the dashes get cracked really bad because the sun shines in and just destroys any kind of plastic or anything really down here that the UV can get. You know, especially on the older vehicles that don’t have the same UV protection in the glass that the newer vehicles do. So it’s sort of a double-edged sword. I can find great bodies and great frames, really nice metal parts, but all the plastic is just destroyed, and a lot of the trim on the outside of the vehicles is also that way, also destroyed by the sun. So it kind of depends on where you live as to what you can find and what you can’t in a junkyard or from a local dealer. And that’s where you may have to go on to eBay. But what’s nice is that if you live in a place like the Southwest where I could find a great body, maybe not such great interior bits, but a great body, then what I can do is I can pull off the parts that I need and then turn around and sell the parts that are nice that I don’t need because my other vehicle is also nice. I can sell those on eBay to somebody from the North who needs rust-free parts, and that just gives me more money to play with.

Let’s take a look at some of the parts that I got, and I’ll use them to kind of go over some of the things that I think are going to be important to finding parts for older vehicles or for restoration vehicles. So we’ll start with these door pillars. These are the door pillars that I got from that guy locally. They look pretty good on first inspection. They’re the same color as the interior of my truck, and the pictures online look fantastic. But if you look real close, I’m not sure you can see this or not, but there’s a crack right there, and that’s exactly the same that the door pillars in my truck are cracked. And that’s the entire reason I went to go pick these up was because I needed to find a way to get that crack fixed. And the easiest way is to find old stock, so that’s something to note. One thing is understand that if you find old parts in a junkyard or from someone on Facebook in a vehicle that’s already been on the road, it’s gonna be used. There’s nothing you can do about that. The pictures on Facebook aren’t going to pick this stuff up. As a matter of fact, I didn’t even really notice it until I got home. Now, it was still a good price, so I don’t regret buying it because it’s always good to have a backup, which is another good tip. Always have a backup of the parts, especially parts that you can’t find anywhere else because if I want to try to maybe paint this or fix this with some super glue or some epoxy or something, I can do that, and if I screw it up, I’ve still got my original. It’s in my truck, so that’s not a big deal.

One thing to note about parts that you can’t find online and you have to go somewhere to get, like an older truck or an older vehicle, is that a lot of these parts always fail the same way. For example, these here, this crack right there, this one here, exact same crack in the exact same place, and both of my pillars in my truck have cracks in this exact same way, in this exact same place. So a lot of these parts fail the exact same way, whether it’s a weak design or just the way that people take them on and put them off. For whatever reason, a lot of parts tend to fail the same way, so be on the lookout for that.

Another part that I got was these visors. Now, these visors actually are in quite a bit better shape than the ones that I have in my truck. And again, what’s great about these is that if I need to, I could probably take this all apart and redo it. You know, I don’t know if you reupholster visors, but put new coverings on them. And then if I screw them up, well, I’m only out the money that I use to buy this stuff, so, and it wasn’t that much. I got a good deal on it.

The last thing that I got was this interior complete interior dash piece, which is nice because it’s got the glove box, it’s got the AC vents, it’s got the entire AC duct work behind it. Now, it’s got the environmental controls, but these don’t match my truck because this one’s got a selector switch for front and rear gas tank, and my truck’s only got one gas tank, so I can’t use this. But I might be able to pull this off and sell it, or even in the condition that this one’s in, probably more likely give it to somebody who’s going to need it, and then I can forge a friendship with someone who needs the same kind of parts that I do.

Another good thing to note, which I don’t have an example for here, although the AC unit controls here is kind of an example of this, is just because the part fits a year that comes off of your vehicle or a generation, maybe the same truck. For example, I believe these parts probably came out of a Bronco, which is the same generation as my truck and generally has the same interior pieces. But just because they came off the exact same vehicle, the exact same year, doesn’t necessarily mean that they’re going to fit. So you got to make sure that you buy parts that you know are going to fit your vehicle. So these parts that you need, just, yeah, if you need to take them off your vehicle first and inspect them to make sure that they’re the right fit. You could, uh, a lot of times these parts have part numbers on the back. I don’t know if you can see that right there, but there’s part numbers right there, and those part numbers will tell you exactly what part you’re looking for. So always be, uh, cognizant of that. That just because it comes off a vehicle the same make and model and maybe even same year doesn’t always mean that it’s going to fit. On the other hand, some parts from vehicles of a completely different generation may fit yours. So for example, this is an ’85 F-150. The generation goes from ’80 to ’86, but the following generation of trucks from ’87 to ’91, a lot of times parts and pieces from those trucks will fit directly into this truck. Parts of the chassis, parts of the suspension, the interior parts like seats, that kind of stuff sometimes just a basically direct swap.

So learn in your vehicle what different generations parts are interchangeable. A lot of times, uh, especially, you know, for this truck here, there’s a site called Gary’s Garage Mahal that has a lot of interchangeability information, and, uh, those sites are really invaluable. So if you can find a site like that that has interchangeability information for your vehicle to other vehicles of the same make and model but different generations, that’s a great resource when you do find parts that are hard to find for your vehicles. And if you can get a good deal on them, even if they’re not perfect, you may want to go ahead and grab them because there’s a lot of ways that you can refinish parts like this. Even with the crack, you know, I could super glue this crack. I could perhaps put some epoxy in here. Um, I could repaint this whole thing, and if you get textured spray paint, then you cover this up and never even know the crack was there. And as long as you seal the crack well enough so that it doesn’t reappear when you put your screw in, then you’re good. You could put fabric over top of this. I’ve looked at doing maybe some canvas or some other kind of fabric that you can get some spray adhesive and spray on and then roll on top of this. And again, if I’ve got an extra piece and I screw it up, oh well, I’ve got the original still in my truck. Pieces like these visors, you could cover these with basically whatever you wanted. I could go get some denim and cover them with denim. You can make the look in your vehicle whatever you want. Now, unless you’re going for specifically the OE original equipment look, then your options are more limited. But I’m not really doing that. I’m just kind of going for what I think looks cool, so I could cover these with anything I want.

Another option that you have, especially for plastic parts, is to dip them. So I may, I’m not sure yet, but I might dip my dash. Dipping is a really cool procedure where you have a film that goes on top of a tub of water, and you dip a plastic part into the film, and the film attaches to the plastic and then wraps around it. If you’ve never seen any videos of it, it’s really cool. You should check that out. I’m definitely thinking about maybe doing that for some parts in my dash.

So I talked earlier about how I got these parts from Facebook Marketplace, and there’s a reason why Facebook Marketplace is my favorite place to get old parts. We’ll get into that in just a little bit, but before I do, let’s go over some of the places where you can get new parts for trucks, especially like the ’85 F-150 behind me. So you can go to LMC Truck. It’s lmctruck.com. They’ve got parts for Ford, Chevy, GMC, Dodge, all these different kind of older trucks, and they’re a fantastic place to get whatever parts you can that are reproduced. You can usually find them at LMC. You can also go to Rock Auto. Rock Auto is a good place to get, uh, automotive parts, more mechanical parts. Usually, you can go to CarParts.com, it’s formerly JC Whitney. I’ve already said that. Of course, eBay is a fairly decent place to get parts, especially you can get new or used parts from eBay. eBay is the place where I would go to sell parts if I parted out a vehicle because you could also go to Craigslist, but your local area usually, especially in a smaller area like I live, you don’t have a lot of options to sell especially specialty parts for older vehicles. So eBay is usually your best bet there. It’s also your best bet to find those parts because of that same reason. You can go to Amazon. Amazon sells basically everything except for old used parts you can’t find anywhere else. Um, of course, there’s the old standbys: AutoZone, O’Reilly’s, Napa, those kind of places, but you’re probably not going to find vintage parts there. That’s for things like, you know, oil filters and spark plugs, that kind of stuff. Um, if you’re doing a performance build, then you can look at places like Summit Racing or Jegs to get your performance parts. And, uh, there’s always, again, the option of going to a pick-apart, although I’m not a huge fan of pick-a-parts. Again, because the ones around here especially don’t have vehicles that really match the years and generations that I’m looking for. And then you have to bring a bunch of tools with you. You’ve got to go into the yard. Sometimes it’s muddy and dirty and nasty and disgusting. You got to crawl around, and you have to know, which is kind of a downside for me, is you have to know how to get to the part that you want. I’m a rank amateur at this stuff, so even though I know where the part is and what the part is, it may be hard for me out in the field to know exactly how to get it out. And I don’t necessarily want to go take a Sawzall to somebody’s, you know, junk or truck, even though it’s a junker truck, just to get the part that I need. So I tend not to go to pick-a-parts unless I really, really need a specific part that I can’t find anywhere else. And then, of course, like I said before, there is Facebook.

So let me give you an idea of why I think Facebook is really, right now, as of October 2020, the best place to find some of these old parts. Now, the complaint that I had earlier about Craigslist was that it’s only good for the local area, and you may say, ‘Well, Ed, that’s the same problem with Facebook Marketplace.’ You only get results from your local area, and that’s true. You do only get results from your local area. But Facebook has something that you really should take advantage of if you’re restoring an older vehicle, and that’s Facebook groups. Because I guarantee you, no matter what vehicle you’re trying to restore, there is a Facebook group for your vehicle. There is at least half a dozen Facebook groups for this truck right behind me. There’s a Bullnose group, there’s a Ford truck group, there’s a group for the engine that I’m using, there’s probably a group for whether or not the truck is lifted, there’s a group probably for the color of the truck. I don’t know if that’s true or not, but there’s a group basically for anything, and there’s new groups being started all the time on Facebook. If you join these groups, you’re going to get together with a bunch of people who are like-minded, who have the same sort of passion for that vehicle that you do, and they probably know collectively way more than you’ll ever know. Even if you’re an expert, you can always ask the group questions to get answers to, you know, whatever problems you may be facing with your vehicle. And if you’re looking for a specific part, nobody’s going to know how to find that part better than this humongous group of people who work specifically on that kind of truck out of a passion for that. Well, I said truck, but whatever vehicle it is, right? I deal with trucks, so I say truck. But, you know, in my case, if I was looking for, for instance, the trim. Now, I’ve got a chrome trim around my wheel wells here, but there are a lot of these F-150s and Broncos that have trim up on the side or they come down a little bit further down, and a lot of that trim they don’t reproduce, and it’s almost impossible to find. Trucks that did have that trim a lot of times didn’t survive, and the ones that did have the trim and did survive, the trim can be in really bad shape. So maybe somebody removed it. Trucks like that in a junkyard, the guys that know that this trim is worth a lot of money go and scavenge that trim pretty much right away. If you need that kind of a trim or that kind of a part for your vehicle, the only place that you’re going to be able to find it with any kind of reliability is going to be these groups. Now, you may have to pay a pretty penny for it, but I have been shocked at the number of times that I have seen someone ask for a part that is incredibly rare or incredibly strange or something I’ve never even knew came standard on some of these trucks, and I’m thinking, ‘Man, they’re never going to find that part.’ And within a couple of hours, somebody responds and says, ‘Yeah, I got one of those in my shed. I got one of those in my garage. PM me and we’ll get together.’ That stuff happens all the time. So if you’re restoring a vehicle and you’re looking for these parts, join a group. Join a group on Facebook. Even if you don’t have a Facebook, I mean, who doesn’t have a Facebook? But even if you don’t have a Facebook, it’s worth joining Facebook just for one of these groups. Learn how to use it. Learn how to do it because if there’s a part you’re looking for specifically, that’s where you’re going to find it, is one of these Facebook groups.

There you go, guys. Parts, you need them, you want them, you got to have them, and those are the only ways that I know how to get them. Now, I’m sure there are other ways, and if you know other ways or better ways, please let me know. Drop it in the comments, send me a private message, whatever you got to do, and I’ll, you know, make a video about it later. But yeah, let me know what your best way to get parts are. For me, these are the ways that I know how to get them. So as I said before, parts for these old vehicles, sometimes they’re the hardest part. Now come on, I’m a new dad. I gotta be able to make dad jokes. That’s just part of who I am now. So if you don’t like puns, you’re probably on the wrong channel. All right, guys, as always, if you have any questions, comments, concerns, gripes, internet ramblings, stick them below. Thanks again for watching, and we’ll see you next time.

Hey folks, Ed here. Welcome back to Bullnose Garage! Today, we’re diving into a topic that every classic vehicle enthusiast knows all too well: hunting down those elusive parts for your restoration project. If you’ve ever spilled your coffee while scouring eBay listings or missed dinner because you were crawling through a pick-a-part yard, this one’s for you.

The Hunt for Classic Parts

Restoring an older vehicle is like a treasure hunt, except the treasure is buried under layers of rust and nostalgia. Parts for these classics can be elusive, and when you do find them, they might be marked up like gourmet caviar. For my Bullnose project, I’m on the lookout for interior parts: door pillars, visors, and a whole dash piece. These aren’t parts you can just click and ship from Amazon; they require a bit more detective work.

Scavenging and Networking

The first rule of parts hunting? Network like you’re at a speed dating event. I’ve got a local connection who strips down old vehicles and sells the parts on Facebook Marketplace. This guy’s a lifesaver since the parts I need aren’t reproduced anymore. In fact, the dash piece I need isn’t available online. So, I’ve got to hunt down old stock from similar vehicles.

Facebook Marketplace is a goldmine for finding these parts. It’s like a swap meet on steroids. And if you can buddy up with someone local who shares your interests, you’re halfway there. Remember, your local pull-apart yard might not have what you need, especially if you’re dealing with an ’80 to ’86 F-150 like mine.

Parts Vehicles: A Restorer’s Best Friend

If you’re serious about restoring an old truck, consider finding a parts vehicle. It’s not just a donor; it’s a treasure chest of potential. Grab a non-running F-150 or Bronco, and you’ll have a wealth of parts at your disposal. Plus, anything you don’t use, you can sell to fund more parts. It’s like turning your hobby into a mini business.

Geography and Its Impact on Parts

Living in the Southwest is a mixed blessing. The dry climate means less rust, but the sun wreaks havoc on interiors. Plastic parts, especially dashes, are often cracked and brittle. But hey, at least the frames and metal parts are in good shape. If you’re in a rust-prone area, consider trading with someone from a dry climate. Your rusty frame might be their perfect interior match.

Inspect Before You Buy

Caution: parts you find may be cracked, worn, or otherwise imperfect. Inspect them thoroughly—you might not notice a crack until you get home. But fear not, having a backup is always a smart move. You can always experiment with repairs, knowing you have a fallback.

The Joy of Facebook Groups

Now, let’s talk about the unsung heroes of parts hunting: Facebook Groups. For every classic model, there’s a community of aficionados ready to help. These groups are invaluable. Whether you’re seeking a rare trim piece or obscure engine component, these folks have your back. And don’t be surprised when someone pulls a rabbit out of their hat and finds that part you thought was extinct.

Creative Solutions and Repairs

When you can’t find a pristine part, sometimes you have to get creative. Cracked plastics can be glued, epoxied, or even repainted. If you’re feeling adventurous, consider dipping parts to give them a new life. There’s a world of DIY fixes out there, so don’t be afraid to experiment.

Online Resources and Retailers

For new parts, there are several online retailers worth checking out: LMC Truck, Rock Auto, CarParts.com, and of course, eBay for both new and used parts. Summit Racing and Jegs are also great for performance upgrades. But remember, some parts just can’t be found new, and that’s where your sleuthing skills come in.

Wrap-Up

So there you have it, a crash course in finding parts for your classic truck. Whether you’re cruising Facebook Marketplace or bartering in a Facebook group, remember that patience and persistence pay off. Let me know your parts-hunting strategies in the comments. And as always, thanks for tuning in. Catch you next time!

Now, go check out the video above and let me know what you think. Happy wrenching!


Bullnose Garage at YouTube

If you want more specific information on Bullnose Ford Trucks, check out my YouTube Channel!

For more information on Bullnose Fords, you can check out the BullnoseFord SubReddit or Gary’s Garagemahal. Both are excellent resources.

As an Amazon Associate, I earn from qualifying purchases. If you see an Amazon link on my site, purchasing the item from Amazon using that link helps out the Channel.