Show Transcript
Howdy folks, Ed here. Welcome back to Bullnose Garage. About a month ago, I had a comment on one of my videos telling me that my truck was screaming for a buff and a polish. Well, who am I to deny the screaming requests of my truck? Today, I will be starting the process of giving this truck a good thorough cleaning and then a good thorough buffing. Now, I don’t plan to do the last stage of polish. This truck has really old paint, and this paint’s going to be replaced and repainted at some point, so I’m not too worried about this. Actually, this is really sort of a test for me, a learning experience. I’ve never buffed a vehicle before. Like a lot of the things on my channel, I’ve never done this, so this should be interesting.
But the first thing I’m going to do is give her a good cleaning. I’ve got a pressure washer here behind me, so we’re going to use some McGuire’s Gold Class soap and my pressure washer to get it all washed down. And then once that’s—the basic heavy-duty grime is washed down, I’m going to give it a hand washing. Once the hand washing is done, I’m going to do a clay bar on it. Um, actually, before all that’s done, before the clay bar, then I got to go through and get rid of some of this peeling clear coat. I got peeling clear coat everywhere, so I need to get underneath that and sort of get that back to a good line between the old paint and the clear coat. I’m not going to worry about sanding off the old clear coat or anything like that. We’re just doing this as is. We’re going to see how it turns out. I mean, no matter what, it’s got to be better than what it is because this paint is really, really bad.
So after the clay bar, then I will get my buffer polisher out, and we will use some McGuire’s Ultimate Compound and some different levels of buffing pads to see what we can do to this old paint. Once that’s all done, I’ve got some ceramic coating that I bought just to see how that works. A lot of this stuff is just me testing things out so that once I do get the real final finish on this truck, I know exactly what sort of products that I want to use. So I’m really interested to see exactly how this turns out. Like I said, it’s got to make the truck look better, no matter what, basically, unless I take all the paint off. But hey, you know, even then, I get it down to metal, clear coat it, and call it patina.
All right, so let’s get to washing. So before I continue, there are a few things that I’d like to talk about or point out. For one, I’m really washing this truck at the wrong time of day. I’m in an actual middle of the day. The sun is at the highest in the sky that it could be, and I did have some problem with the soap drying before I could get the rinse coat on there. But I’m not too worried about that because I’m gonna do a hand wash on this anyway and get some of the stuff the pressure washer didn’t because I didn’t want to get too close to the pressure washer.
The other thing is that this hood has some really thin paint on it. There’s a lot of places, actually, where the metal is coming through. So if I were somewhere else in the country, I would probably clear coat this hood. I would sand the clear coat that’s already on here. There’s a little thin strip of clear coat on the front of this. I would probably sand this clear coat back to make it nice and even with the paint and then sort of, you know, feather it in and then probably get some of that same 2K clear rattle can stuff that I had before and just tape things off and do a real quick clear coat on the top of this just to seal in all that exposed metal. Because I’m in the southwest, rust really isn’t a thing down here. I mean, it is, but it takes a long, long time, and I’m going to repaint this thing well before I have any problems with rust eating through the hood.
And on top of that, I’m not even sure that this is the hood that I’m going to keep going forward. I may want to get a hood with a scoop or some other stuff. Hoods are relatively inexpensive, especially if you can, you know, go into a pick apart or something. So the hood is the least of my worries. It’s the other body panels that I’ll be worried about, and all the other body panels are good. There’s a few chips, but for the most part, the paint is pretty good on those and nice and thick, so I’m not real worried about that. I did get an ultra-fine buffing pad for the hood specifically just to make sure that I don’t take off any more paint than I have to. I do expect—see, I’m getting red on my fingers just doing that. So, um, yeah, this paint is really ultra-thin and is going to come up super easy, so that’s why I got an ultra-thin pad for this.
So anyway, I just wanted to get that stuff out there. I’m going to do a hand wash on this probably later this afternoon once the sun gets a little bit lower and the weather or the temperature starts to drop a little bit. That way, my water doesn’t dry quite as fast. I’ve got a little bit more time to actually do the hand wash. Once the hand wash is done, I’m going to get her into the garage so that the crazy amount of dust in this New Mexico air doesn’t fall on the truck while it’s sitting outside. And then I’ve got time over the course of the next week or so to do my clay bar, to do my buffing, and all that fun stuff. So I know that was a long explanation, but I just want to let you guys know exactly what my plans are, what I’m doing, and you know, that way I don’t have to do a voiceover later, which is kind of a pain in the butt.
Okay guys, before I start doing this, I want to give you a little tour of the paint on this hood. Now you can see here where the clear coat is delaminating, and then along these front quarter panels also, it’s delaminating. And then front up here on the hood. And so this portion is going to be an issue, but I’m not too worried about it. What I’m worried about is things like this. Um, this, of course, is bare metal. And now, like I said before, I’m not too worried about it rusting, but you can see here where I actually painted over it with something just to keep the bare metal from being exposed. Um, I didn’t bother to do that over here because I think that looks ugly. I wasn’t gonna do it again anyway. Um, what I’m really kind of worried about is like this. Okay, now this is not—I haven’t buffed this. Um, I haven’t done anything to it. This is simply what’s come about as a result of me giving it a good wash. I haven’t clay barred yet. I haven’t really done much of anything to it yet. And here you can see some more of the clear coat delamination. There’s also a spot over here where it’s starting to do the same kind of thing. So it’s going to be really interesting to see what happens to this hood when I buff it. I am still planning on using the buffer on this hood because I want to find out what happens to these spots when you buff them. And I’m sure that a good detailer or body man could tell me exactly what’s going to happen, but I learn by doing, and so that’s what I’m going to do.
My next major task is going to be the clay bar of the truck because this paint has a lot of really rough spots. I can feel it. And before I buff it, I want to make sure that it’s as clean as I can possibly get it. But before I can even do that, I need to take care of these little areas here where you can see the clear coat is coming off. Now, I’m not going to worry about sanding or blending or doing anything like that. I just want to get as much of this little flakiness off as possible. So what I’m going to use is actually a paint brush. This is a new paint brush, and if you run it along, you can see it’s kind of bringing this back right to the edge here and removing a lot of the flakiness. And I’ll have to go back over this real quick just to get all these little bits and pieces. Anything that this doesn’t pick up, I will just run over with the clay bar and then eventually hit with the buffer. But there’s a lot of this on the truck, but you can see where that’s actually doing its job. It’s not going to be perfect. This is really old paint, really old clear coat. But if I can get some of these chips off of here, that’s one less thing to snag on the clay bar and one less thing to deal with when I’m actually doing the buffing. And it should make it easier for me to sort of buff blend, if that’s even a term, these little delaminations here so that they’re not quite as obvious. As you can see, there’s a whole line here that needs the same treatment done to it. So we are going to go ahead and do that. Uh, so that works pretty good. Yeah, I’m going to run through this a couple more times, hit it with a microfiber towel to get some of these little flecks and stuff off the panel here, and then I will go do the rest of the truck. Mostly it’s just around the front and on the hood. Um, and then we’ll be back to start the clay bar.
Now I got a Mother’s California Gold clay bar kit. It comes with everything you see here. This is the lubricant, a couple of bars of clay, and a microfiber towel to rinse things off or wipe things off when you’re all done. Now I am not going to use this entire bar of clay. I’m going to open this up and divide it probably into two different pieces. That way, if something happens—I mean, if you drop one of these on the floor, it’s garbage, so you got to throw it away. So, and then, of course, once it gets full of garbage and crap, which these will because my truck probably hasn’t been washed in 20 years, then you got to throw it away then too. So I’m probably going to split both of these bars into two pieces right down the middle, and that should give me plenty of clay to do what I got to do, but also give me a spare piece. I’m hoping I could do the whole truck with just one bar. If not, I have a second one, so we’ll see how it goes.
So quick update, here is the truck after being clayed all the way around. You can clearly see on the hood there I’ve lost a little bit more paint. It was easy to see on the bottom of the clay bar that that paint was coming up. But again, the hood is my biggest concern. You can see here, especially on the ridge, where some more of the red paint has come up. And then over here, so red paint has come up there. So what I’m going to do is when I buff this hood, I’m going to tape off these ridges with masking tape and this one and this one. And then I’m going to hand buff these ridges, and they won’t get nearly as shiny, but hopefully that’ll help protect some of that paint. So that’s my hope.
So here’s the rest of the truck. It looks much better than it did. You can actually see some reflection in these back panels. I have not buffed this yet. This is just cleaning and clay bar, so there is no clear coat on this paint here. I think this is just single-stage paint in the back. I’m not sure what they did to this truck. Clearly, those front quarter panels are two-stage. There’s a base coat and a clear coat, and then these back parts of the truck are single-stage. So I’m not sure who repainted it and when and how and all that stuff, but there’s been some paint work done to it. But it does look way better than it did. So when I buff, I’m going to start with the bed because that’s where the paint is the thickest. The old paint is there, and there’s a few scratches and stuff, but it’s an old truck, so there’s going to be. So the bed is where the paint is the thickest, so I’m gonna go ahead, since I’ve never done any buffing, power buffing before, I’m gonna start back there. That’ll give me the most leeway and get me used to the feel of the buffer before I go up front and do the hood. So that’s what’s next.
A few things here before I get started. I’m going to start with this panel here. It’s relatively simple. It’s relatively flat in comparison to the rest of the stuff on the truck. I’m going to sort of cut my teeth, so to speak, since I’ve never done this before, on a pretty simple panel. Now I’ve got this panel all taped up. You want to tape up anything that you don’t want the buffer to touch, so my chrome—this chrome bar up here—and I’ve also taped off the fuel door because it’s got some sharp edges, and I don’t want to run the buffer over top of these sharp edges and remove more paint than I’d like to.
So what I’m going to do is I’m going to come at this at angles like this and not back so I don’t hit this edge here going back this way. It turns out that a lot of the preparation I did here didn’t make any difference. I wasn’t using a strong enough buffing pad or compound to cause the kinds of issues I’m talking about, at least not on the bed of the truck. I even ended up using my old buffing pads on the chrome when I was done since the Ultimate Compound and the buffer made the chrome parts shine up really nice. And I’ll always try to come at it like this, and then when I’m done, I get the whole panel done, then I’ll come back and take the tape off of this door and tape around here, close the door back up, and then I’ll buff the door just that little bit. I may actually just buff this door by hand rather than use the power buffer.
So what I have is this Tacklife rotary buffer. I picked this up from Amazon. It’s got a digital readout on it, and it’s got really good reviews, so we’re gonna see how well it works. And I’ve also got these seven-inch Bauer foam pads I got from Harbor Freight. I’m using yellow for the entire truck except for the hood. For the hood, I’m using white because white is sort of an ultra-fine. It should do a lot less cutting than the yellow does. The yellow is just a little bit harsher than what the white is, so I can be a little bit more aggressive on this paint, but it’s nowhere near as aggressive as I can get. Again, this is my first time. I’m not going for a show-quality finish, far from it. I’m going for better than it was, so hopefully I can get to that by doing this. I’m using McGuire’s Ultimate Compound because supposedly it kind of does everything all in one compound. Again, not going for a show-quality finish. I’m going for an Ed in his garage better than it was before finish, so hopefully this works out fine for me.
Along with the yellow buffing pad, we’re gonna find out because I’m about to kick this thing off, so we shall see. So, so, so, real quick, let’s take a look at this. Obviously, this is where I have buffed, and this is where I have not. And I haven’t spent a whole lot of time on this. I’ve just gone over it once. You can see, um, if I get real close into here—actually, it’s kind of hard to see on the camera. There we go. You can see scratches and stuff that exists in there. Man, this is 30-year-old paint. This is 30-year-old paint, so there’s gonna be scratches and stuff. I’m pretty happy with how this is turning out. I’m trying to be real gentle with it, so I’m not being real aggressive. I’m not putting hardly any pressure on it at all, and this is really buffing out nice, so we’re just going to keep going.
So, so, if my goal for this truck was to make it better than it was, then I think it’s pretty obvious that I have met that goal and actually, at the very least, met and maybe even exceeded my expectations for my first time ever doing this. Now, I could probably get better than this. In fact, I know I could. But for, you know, Ed in his garage doing this for the first time ever, I’m pretty happy now. I don’t know if you can see over here what it used to look like because I haven’t done any of the cab stuff yet, but this is way shinier than that. And as a matter of fact, if I back up, I can see myself in the finish here, whereas over here on this side, if I’m looking straight on, I can’t see anything like that. Now, I don’t know that I could actually—I can actually shave in there. Maybe like if it was the apocalypse and there were no mirrors available anywhere, I could probably get away with it. But, uh, the bottom line is that I’m really happy with it.
Now I’ve got to do the rest of the truck, and I am not going to bore you by having you watch me buff the whole rest of the truck. But I am going to bring you back when I do the front quarter panel, one of the front corner panels and the hood because those are the other areas on this truck that are sort of special consideration. So the front quarter panel has a line where the clear coat meets the base coat, and I want to try to see if I can feather that line out a little bit to make it as nice looking as possible. And then, of course, the hood has really, really thin paint, and so I’m really interested to see just how much of that paint I’m going to take off and what that hood’s going to look like when I’m done. And I’m going to do the hood last. That way I get as much practice on the thicker paint of the rest of the truck as I can before I tackle the hood. So I will bring you back when I am doing the front quarter panel.
Okay, so I looked. I will make you watch me buff this door. I’m just so impressed by the difference it makes. And I think looking straight on as I buff out the door really showcases just how quickly I go from dull paint to shiny paint. Remember, this door is as clean as I could make it with hand washing and clay bar. It’s not like I’m just wiping off dirt here. I’m actually restoring the shine on this 35-year-old paint. I said I was going to bring you back when I’m ready to do the quarter panels and the hood, and here we are. I’ve actually already done the other quarter panel on the other side just to get a pretty good idea of how it’s going to go and how it’s going to look. It turned out pretty good, not perfect, but it’s not going to be, so I’m happy with it.
There’s a couple of things that I want to note before I go forward. So I’ve done the rest of the truck, and I found that on this older single-stage paint, 1800 RPM, which is the third highest setting on my polisher, works much better than 1400. It just sort of does a better job, does it quicker, and this paint is pretty robust, so it’s not really digging in too much. I’m not having a real hard time with my edges or anything like that, especially with the polishing pad that I’ve got, which is not real aggressive. I probably could have got a much more aggressive pad and done this a lot quicker and easier, but I’m trying to be cautious because I’ve never done this before. And to be honest, it’s turned out really, really well. The quarter panel on the other side, the clear coat obviously looks fantastic, and this base coat underneath shines a little bit, but it’s not gonna shine like the clear coat does. So, uh, these base coats aren’t really designed to be polished. They’re designed to be covered with a clear coat. You can polish them, and they do shine up, but one thing that you want to be careful of is that these are way thinner under this clear coat than this old single-stage paint is. You’ve got a lot of paint here. It’s real thick that you can go through before you start hitting any kind of primer or metal or anything else, whereas this base coat here, it doesn’t take a whole lot of time, even with a light grit pad and some fairly mild compound, to get down to where you’re starting to get into the primer underneath. And in fact, I did that on the other side, just a small little piece. You’ll never even know it’s there unless you know what you’re looking for, but that’s something to be careful of when you’re doing blending like I’m gonna be doing between clear coat and base coat.
Other than that, I’m gonna turn the machine back down to 1400 RPM for this, so it’s not quite as aggressive, and let’s just see what I’m doing. I’ve also found that using an applicator pad like this to put down your initial coat of compound works really well to prevent the machine, the polisher, from splattering compound all over the place. So I’ve been using this just to get my base sort of layer of compound on the paint and then coming back behind it with the polisher to polish it up. Now it actually looks much better on camera than it does in person, but really it doesn’t look bad. You can clearly see the old area that I have not yet buffed versus the area that I just got done buffing, and if you look pretty close, you can see the line where the clear coat ends and the base coat begins. But if you stand far enough away, it’s really kind of hard to see. It almost just looks like I’ve got a strip of matte paint going across the top when you step back away from it. Overall, I’m pretty happy with that.
So I’m going to go ahead and finish this panel, and then I’m going to do the cowl and the top part of the roof, and then we will move on to the hood, which is going to be one of the most interesting parts. I’ve got the hood sectioned off like this so that I can do one part at a time, really sort of pay attention to what I’m doing, and also because these ridges are a spot where the polisher will eat into the paint the most because that’s where the most pressure is going to be applied. And a lot of these ridges actually already have some paint missing, so I don’t want to grind into these too hard. Once I’m done with the whole thing, I’ll take this tape off, and I’ll do these by hand. So I’m using about the finest pad that I can. It’s this white pad from Harbor Freight, and I’m going to be on 1400 RPM, which is the second lowest setting, just to try to make sure that I can get some cutting done, but not too much, again, not to take off too much of this paint. So we’re going to go ahead and lay our compound down and get the buffing.
So, so, bye. Mmm, well, it’s far from perfect, but considering how careful I’m trying to be not to eat into this paint, I think it’s as good as I’m gonna get. And I think once I get a coat of the ceramic on here to protect it, no matter what, it will definitely look better than it did. So, well, the hood’s done, and as you can see, it’s better but not great. And I don’t know what I could do to make it look better. The paint here is really thin. I don’t know how much correction I could do to this to sort of shine it up or gloss it up. I could clear coat it, but I don’t know if clear coating it would make it look a lot better because I would just be clear coating over a lot of these paint defects and splotchiness and that kind of stuff. Um, you know, I could have used a more aggressive pad and probably got a more uniform look, and I’m sure that you can tell looking at that there’s splotchiness and sort of weirdness all over it as far as the paint goes. But I’m afraid that if I would have used a more aggressive pad or a more aggressive setting on the polisher that I just would have started really eating into the paint. And you can see, I’m not sure you can see from the angle that you’re at, but I think you can see it from the angle with giraffe before. There are some darker spots on this hood, and that’s actually where I’m getting down into, um, you know, the primer or maybe even the previous paint. I mean, who knows? This could have been painted black at some point, and there’s some other kind of paint coming through here.
So, I mean, interestingly enough, I know that this cowl isn’t original to the truck because this pinhole cowl is on the next generation of truck from ’87 to ’91. So at some point, this cowl was replaced, and I’m guessing that at some point maybe this entire front part of the truck was replaced because this front part, the two quarter panels of the hood and the cowl are the only parts that have clear coat. So the rest of the truck may very well be original, and these parts may be added on from another truck. Now, I mean, obviously, they’re bull-nosed parts because the wheel wells, you know, have the bullnose shape to them, and of course, the hood has to be able in those hoods. So, um, I don’t know what happened in the history of this truck, but something happened to where these parts were coated and the rest of the truck was not.
Anyway, back on topic here. So, um, the hood definitely looks better, but I’m not super happy with it. So I think we’re gonna do something else to it. Um, I’ve already got a paint sprayer on the way, and I think I’m gonna plasti dip the hood just probably satin black, maybe put some glossifier on there. I’m not sure yet. Um, you know, I thought about maybe even now once this truck is sort of done and fully painted that I might use plasti dip for the two-tone or maybe a wrap or something else. I don’t know yet, but I do know that I’ve never plaster dipped anything before. Sounds like fun. Should be interesting. Looking forward to doing that and then, of course, making a video on it.
So the next thing that we’re gonna do is get all this tape off the truck, get it all wiped down, nice clean cloth all the way around every single surface, get nice and wiped down, and then I’m going to put a ceramic coating on all this so that it stays nice and clean and sealed. So that’s next. Oh, by the way, I’m sure that you can see this right here, this swirl mark. Yeah, that wasn’t done by me. Okay, what that is is I had one of these guys, you know, these guys that come door to door, and they try to sell you this cleaner junk, right? And they try to get you to buy all these big bottles of their super magical wonderful cleaner. And this guy had the nerve to walk over to this truck and get a rag out and spray some of his cleaner on the rag and start grinding it into the truck to show me how amazingly it cleans. Yeah, yeah, I was not very happy with that guy. But obviously, the cleaner works fairly well because even after buffing, I still can’t get the crap that he cleaned the marks off the hood. Jerk.
The entire truck paint-wise has been buffed. I’ve gone around and polished the chrome and other little metal bits, and I’ve also cleaned my windows, which is pretty everyday simple stuff. I’m not going to bore you with. The last thing that I’m going to do for this video is I’m going to spray on this ceramic spray coating. So ceramic coatings are relatively new. Typically, in the olden days, you would put on a coat of wax, and a lot of people still do put on wax. And as a matter of fact, um, I’ve never used a ceramic coating like this before. So, um, I say that a lot, right? Like I’ve never done this before. Let’s do it for the first time ever on camera on YouTube. So, but that’s, I guess, what my channel is about. So, um, this is a Turtle Wax Hybrid Solutions ceramic spray coating, and I’m using this because Project Farm actually did a sort of a test of a whole bunch of different ceramic coatings, and this stuff came out pretty close to the top. So, I will link that video in the little card or something somewhere. You should go check that out. It’s a pretty cool video. He does a really great job on this stuff.
But anyway, it’s pretty simple. All you’ve got to do is wipe everything down. So sometimes the polish or the compound leaves a little bit of a residue, and I have gone over the truck already with a cloth after I was done, but I’m gonna go over it one more time real thoroughly with just a real clean microfiber cloth just to make sure I got everything off. And then once that’s done, um, you’re supposed to spray two shots of this on every panel. Um, but I’m—it doesn’t really say what a panel is. I’m guessing a panel is probably like that sort of an area. So we’ll do two good shots of that, and then I got this little applicator that I’ll use to rub it on there and do the whole truck that way. And that should serve as a replacement for a wax coating, and this stuff is supposed to last for like about a year if you do two coats. So that’s what we’re gonna do, and hopefully, um, it’ll last that long. We’ll see how long this paint job is—this polish job, anyway—is it gonna last. So let’s get to it. This is the boring part right here.
Now the bottle says once you’ve got one coat applied, you should dry it with a microfiber towel, so that’s what I’m doing. The bottle also says that for 12-month protection, you should apply a second coat, but it does not say how long you should wait between coats or anything like that. Mm-hmm, yeah, no information about that. So I am just going to go ahead and put my second coat on now so that I can say this panel is done. Uh, it already looks really good. It feels super smooth. So, but while we’re here and I’ve got the stuff, we’re gonna put a second coat on to give me as much protection as possible. So let’s do that.
All right, well, there’s one panel completely done and the entire rest of the truck to go, so I will do that and see you on the other side.
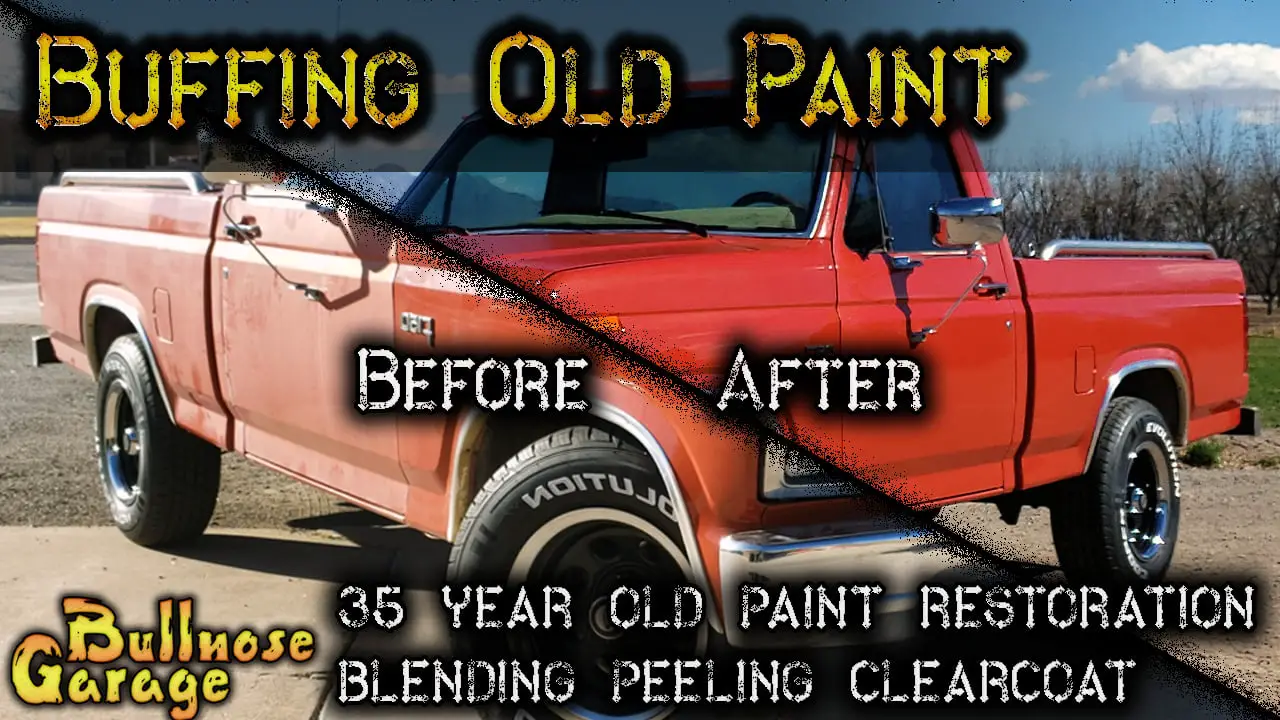
Do do do, here we are with the final product, and I gotta say I think it looks pretty good. That’s not a professional job, but I think it’s probably a pretty solid, pretty solid amateur job, you know, for a couple of weeks’ worth of work—washing, clay, buffing, and then putting some ceramic on top. I think it definitely makes a big difference. Now this paint is never gonna be perfect. I can look at it right now and see lots of little tiny scratches, some haze areas where the paint has just been worn away. And, uh, you know, that’s what you get for a 35-year-old paint job. At least in the back part here where this is the old single-stage stuff. And, uh, you know, you’re never gonna, without some serious correction, make it perfect. And I am in no position in terms of my time or my experience level to do any serious correction on this truck, but I am again real happy with this.
If you’ve got an older vehicle that’s got some oxidation on the paint, um, that just needs a little bit of a refresher, especially if it’s got this old single-stage stuff on it, uh, you know, a buffer and some buffing pads and a little bit of compound will really just bring the shine right back out, and I highly recommend that. You know, I’m really happy that that guy on YouTube was like, ‘Ah, this truck is screaming for a buff and a polish,’ because I, you know, I think it was right.
The other thing to talk about real quick is this hood and the top of these quarter panels. Now I’m not sure if you can see it from where you are, but there’s definitely a demarcation line where the clear coat on this quarter panel ends and the base coat begins. But in terms of color, they’re very similar. It’s just sort of the shine. So the top of this looks kind of matte, and of course, the bottom looks glossy. As you get back far enough, I mean, yeah, you can see it, but it doesn’t jump out at you like it did before, so I’m really happy with that.
This hood is another story because it’s not just about the clear coat of the shine of the hood. The paint on this hood is actually really pretty badly damaged, and there’s a lot of places where the metal is coming through, and it’s just kind of ratty. So no amount of paint correction with a buffer is going to fix that, which is why I’ve decided to plasti dip this hood. I figure the hood will be a really good practice ground for some plastic dip practice. I’m planning on plasti dipping parts of my other truck because it’s having the same problem with the clear coat peeling, and I think plasti dip is an easy and sort of undamaging way to make that look much better without having to go through the whole thing of, you know, sanding and painting and all that stuff. So, I mean, you have to do some feathering and stuff to eat the plasti dip to stick, but that’s a whole other thing. Well, we’ll cover that in that video where I’ll either make it look a whole lot better or we’ll turn it into a gigantic debacle, which could also be fun.
So bottom line, glad I did it. Looks way better. And, uh, until next time, if you have any questions, comments, concerns, gripes, internet ramblings, stick them below. Thanks again for watching, guys. We will see you next time. Oh, that was terrible. Thanks for watching, guys. We will see you next time.
Hey gearheads, Ed here from Bullnose Garage. So, I’ve been staring at my 1985 F-150 and thinking it’s time to address its plead for a buff and polish. It’s like the truck’s been whispering, “Help me, Ed.” And who am I to ignore a classic truck in distress?
This isn’t about making this old rig showroom-ready. Let’s be real—this is more of a science project, a learning curve, and a bit of a gamble all rolled into one. I’ve never buffed a vehicle before, so if you’re expecting a miracle transformation, well, lower those expectations. This is about making my truck look a tad less shabby and a bit more shiny.
Cleaning Up the Dinosaur
First things first, I gave her a good wash. I broke out my pressure washer and some McGuire’s Gold Class soap. Not the best time of day for it—thanks to the New Mexico sun—but hey, you work with what you’ve got. After a thorough pressure wash and hand wash, I tackled the peeling clear coat. It’s everywhere, and I’m not about to sand it all off. Instead, I just brushed away the flaky bits with a paintbrush. Yep, you read that right—a paintbrush.
Clay Bar: The Unsung Hero
With the grime mostly gone, it was time for the clay bar. I used a Mother’s California Gold clay bar kit to smooth out the paint. The hood, with its thin, fading paint, was particularly challenging. I lost some more paint in the process, but honestly, I expected it. This truck’s hood is like a patchwork quilt of paint history.
Buffing the Beast
Enter the Tacklife rotary buffer and McGuire’s Ultimate Compound. I started on the bed, where the paint’s thickest, to get a feel for the process. Using Harbor Freight’s Bauer foam pads, I worked my way through the truck, buffing out scratches and bringing some shine back. It’s not perfect, but it’s better than where we started.
The front quarter panels were a bit of a challenge due to the clear coat line. I turned the buffer down to 1400 RPM to avoid digging in too much. I used an applicator pad to apply the compound, which helped avoid making a mess.
The Hood: A Work in Progress
Ah, the hood. My nemesis. The paint here is thin, and despite my efforts, it still looks, well, less than stellar. But I’ve got plans—bad plans, perhaps. I’m thinking of giving it a plasti dip treatment. It’s a low-risk way to experiment and will maybe, just maybe, cover up the sins of the past.
Ceramic Coating for the Win?
To cap it all off, I applied Turtle Wax Hybrid Solutions Ceramic Spray Coating. It’s supposed to last a year, but I’ll be the judge of that. I applied two coats, hoping to keep the truck looking its best—or at least less embarrassing—for as long as possible.
Final Thoughts
So there you have it—a not-so-perfect, but satisfying DIY adventure. If your old truck’s looking rough around the edges, maybe it’s time to grab a buffer and some compound. Or just leave it alone and call it patina. Either way, it’s a journey.
Hit me up with your thoughts below. Maybe you’ve got a tip or two, or maybe you just want to see what happens when I plasti dip the hood. Cheers!

If you want more specific information on Bullnose Ford Trucks, check out my YouTube Channel!
For more information on Bullnose Fords, you can check out the BullnoseFord SubReddit or Gary’s Garagemahal. Both are excellent resources.
As an Amazon Associate, I earn from qualifying purchases. If you see an Amazon link on my site, purchasing the item from Amazon using that link helps out the Channel.